Server Setup
Hosting, web server, SSL, background services and backups
Choosing Hosting
| Shared hosting / cPanel | VPS or cloud server | |
|---|---|---|
| Website and admin panel | Yes, with PHP 8.3 and a changeable document root; Terminal is optional | Yes |
| Cron (scheduler) | Yes, cPanel → Cron Jobs | Yes, crontab |
| Live chat | Yes, refreshes every 10 seconds | Yes, instant with Reverb + Supervisor |
| Mobile app API | Yes (HTTPS required) | Yes |
A VPS with 1–2 GB RAM is enough for a small portal. The install step imports about 156,000 cities, so give PHP at least 256 MB memory and 120 seconds for that one request.
Which Install Guide?
Pick the guide that matches your hosting. Both end at the same place: the web installer creates the tables and your administrator account.
| Your hosting | Follow |
|---|---|
| VPS or cloud server (SSH) | Install with terminal access |
| cPanel or other shared hosting with Terminal or SSH | Install with terminal access (cPanel steps are marked) |
| cPanel or other shared hosting without Terminal or SSH (File Manager only) | Install without terminal access |
Not sure? In cPanel, search for Terminal on the home page. If it is there, you have terminal access. If your host offers SSH, that counts too.
What happens automatically on every host: on the first visit the site creates .env from .env.example and gives it an application key, and the web installer then fills in the database details and your site address (APP_URL), generates the app (JWT) and live-chat keys, and creates the public/storage link. You only edit .env by hand for optional settings later.
Install With Terminal Access (VPS or cPanel Terminal)
About 15 minutes. Commands are for Ubuntu 24.04 with nginx and PHP-FPM 8.3; cPanel differences are noted in each step.
1. Prepare the server
VPS: install the web server, database, PHP 8.3 and Composer.
sudo apt update
sudo apt install nginx mysql-server supervisor unzip \
  php8.3-fpm php8.3-cli php8.3-mysql php8.3-mbstring php8.3-xml php8.3-curl \
  php8.3-gd php8.3-intl php8.3-zip php8.3-bcmath
# Composer
php -r "copy('https://getcomposer.org/installer', 'composer-setup.php');"
sudo php composer-setup.php --install-dir=/usr/local/bin --filename=composer
rm composer-setup.php
cPanel: in Select PHP Version (CloudLinux) or MultiPHP Manager choose PHP 8.3 for the domain and enable bcmath, ctype, curl, fileinfo, gd, intl, mbstring, mysqli, openssl, pdo_mysql, tokenizer, xml and zip. Composer is usually already available in Terminal (composer -V).
2. Set the PHP limits
These limits cover the install step (it imports about 156,000 cities) and one-click System Update (an update ZIP is about 50 MB).
memory_limit = 256M
max_execution_time = 300
max_input_time = 300
upload_max_filesize = 128M
post_max_size = 128M
allow_url_fopen = On
date.timezone = UTC
VPS: edit /etc/php/8.3/fpm/php.ini, then sudo systemctl restart php8.3-fpm. cPanel: MultiPHP INI Editor (or the Options tab of Select PHP Version).
3. Create the database
VPS:
sudo mysql
CREATE DATABASE jobnect CHARACTER SET utf8mb4 COLLATE utf8mb4_unicode_ci;
CREATE USER 'jobnect'@'127.0.0.1' IDENTIFIED BY 'choose-a-strong-password';
GRANT ALL PRIVILEGES ON jobnect.* TO 'jobnect'@'127.0.0.1';
FLUSH PRIVILEGES;
EXIT;
cPanel: MySQL Databases → create a database, create a user, and add the user to the database with ALL PRIVILEGES. cPanel adds your account prefix to both names; use the full names in the installer.
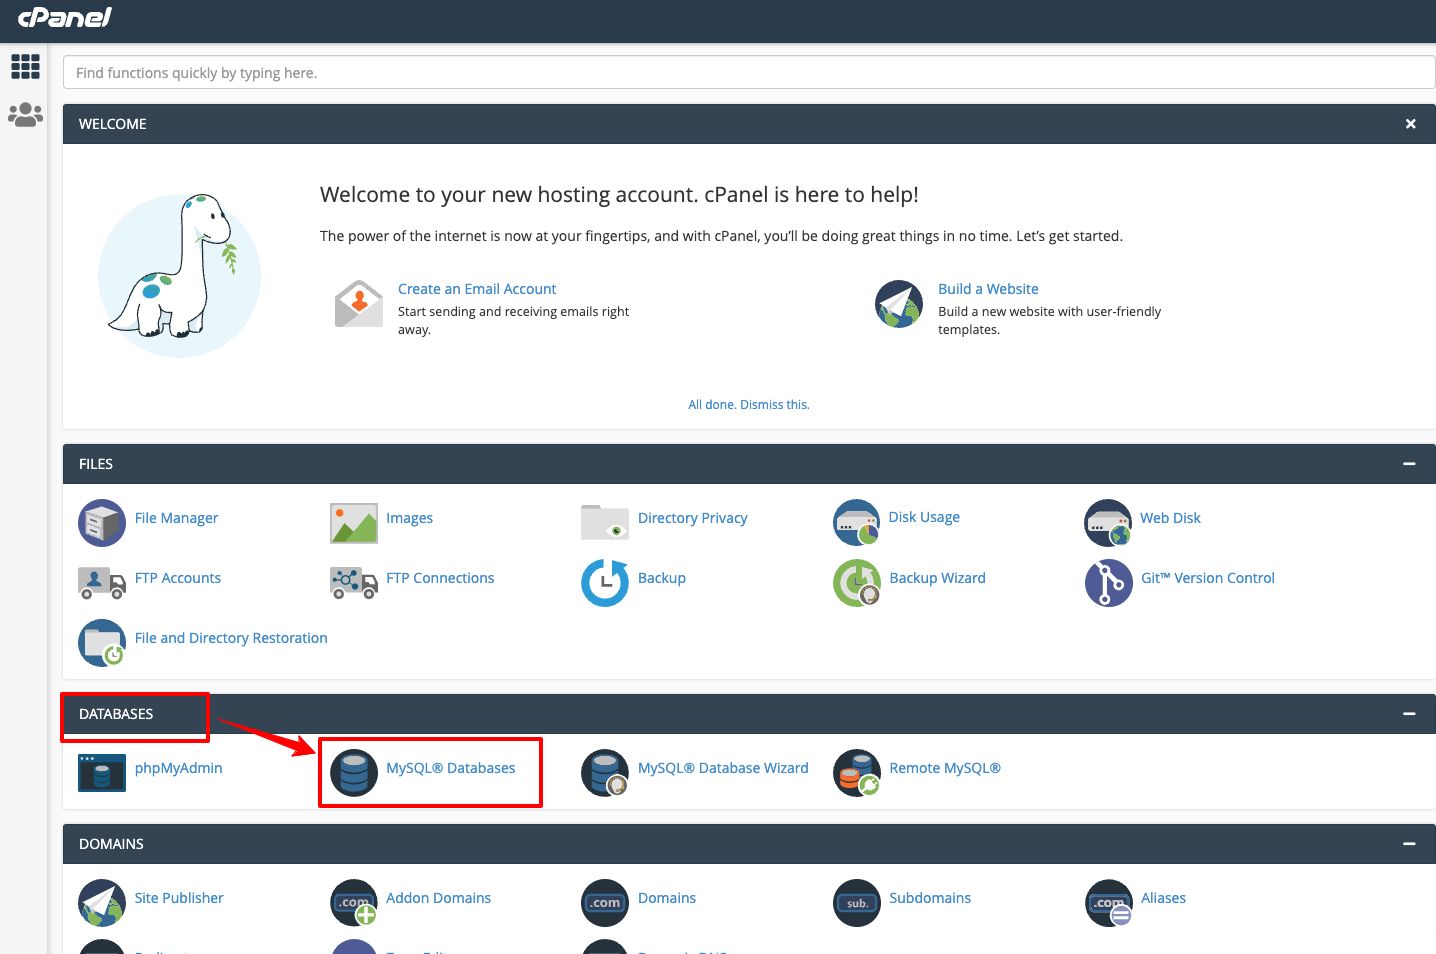
Use a new, empty database. The installer removes every table in the database you give it before it creates its own.
4. Upload the files
VPS: copy the ZIP of WebSourceCode to the server and extract it.
# on your computer
scp WebSourceCode.zip user@your-server:/tmp/
# on the server
sudo mkdir -p /var/www/jobnect
sudo unzip -q /tmp/WebSourceCode.zip -d /tmp/jobnect-src
sudo cp -a /tmp/jobnect-src/WebSourceCode/. /var/www/jobnect/   # or /tmp/jobnect-src/. if the ZIP has no top folder
cPanel: in File Manager create a folder next to public_html (for example jobnect), upload the ZIP into it and choose Extract. Move the contents up so artisan sits directly in jobnect/. Turn on Show Hidden Files in File Manager settings to see .env.example and .htaccess.
5. PHP packages (nothing to do)
vendor/ is included in WebSourceCode, so you do not run Composer to install.
6. Permissions
VPS:
sudo chown -R www-data:www-data /var/www/jobnect
sudo find /var/www/jobnect -type d -exec chmod 755 {} \;
sudo find /var/www/jobnect -type f -exec chmod 644 {} \;
sudo chmod -R 775 /var/www/jobnect/storage /var/www/jobnect/bootstrap/cache /var/www/jobnect/public/uploads
cPanel: PHP runs as your own user, so the default permissions work. If the installer reports a folder as not writable, set storage, bootstrap/cache and public/uploads to 775.
7. Point the domain at public/
VPS: add the nginx or Apache site with the document root /var/www/jobnect/public, then add HTTPS with Certbot.
cPanel: Domains → Manage → set the document root to jobnect/public. If the main domain’s root cannot be changed, use a subdomain or addon domain, or ask your host. Turn on SSL/TLS Status → AutoSSL for HTTPS.
Do not copy the contents of public/ into public_html and leave the rest elsewhere. The site expects public/ inside the project folder.
8. Run the web installer
Open your domain. The site creates .env and its key by itself and redirects to /install. Enter the database details (host 127.0.0.1) and your administrator name, email and password, and click once. The install takes about 20–40 seconds. See Web Installer.
If you prefer to prepare .env yourself first, that still works: cp .env.example .env && php artisan key:generate.
9. Add the cron job
VPS:
sudo crontab -u www-data -e
* * * * * php /var/www/jobnect/artisan schedule:run >> /dev/null 2>&1
cPanel: Cron Jobs → Once Per Minute:
/usr/local/bin/php /home/USERNAME/jobnect/artisan schedule:run >> /dev/null 2>&1Your host may use another PHP path, for example /opt/cpanel/ea-php83/root/usr/bin/php.
10. Optional: real-time live chat
On a VPS, keep php artisan reverb:start running with Supervisor and proxy /app and /apps as shown in the nginx section. Without it (and on shared hosting) the chat still works and refreshes every 10 seconds.
11. Check
- Sign in at
/loginwith the administrator you created. - Open and set the site name, currency, time zone and (optional) home country.
- Set up and send a test email.
- Work through the Go-Live Checklist.
Install Without Terminal Access (cPanel File Manager)
For shared hosting where you only have cPanel (File Manager, MySQL Databases, Cron Jobs) and no Terminal or SSH. You never type a command on the server: vendor/ (the PHP packages) is already in the download, so Composer is not needed.
1. Check your hosting
- PHP 8.3 or newer can be selected for the domain.
- You can set a domain or subdomain’s document root (needed to point it at
public/). - Cron Jobs is available (it runs the scheduler).
- MySQL 8 or MariaDB 10.6+.
2. PHP version, extensions and limits
In Select PHP Version or MultiPHP Manager choose PHP 8.3 and enable bcmath, ctype, curl, fileinfo, gd, intl, mbstring, mysqli, openssl, pdo_mysql, tokenizer, xml and zip. In MultiPHP INI Editor set:
memory_limit = 256M
max_execution_time = 300
max_input_time = 300
upload_max_filesize = 128M
post_max_size = 128M
allow_url_fopen = On
date.timezone = UTC
3. Create the database
MySQL Databases → create a database, create a user, add the user to the database with ALL PRIVILEGES. Write down the full names (with the account prefix) and the password.
Use a new, empty database. The installer removes every table in the database you give it.
4. Upload the files
In File Manager create a folder next to public_html, for example jobnect. Upload a ZIP of the WebSourceCode contents and choose Extract. Make sure artisan, composer.json and the public folder sit directly inside jobnect/. Turn on Show Hidden Files so you can see .env.example and .htaccess.
5. Point the domain at public/
Domains → Manage → set the document root to jobnect/public. If the main domain’s root cannot be changed, use a subdomain or addon domain (for example jobs.your-domain.com), or ask your host to change it. Turn on HTTPS in SSL/TLS Status (AutoSSL).
Do not copy the contents of public/ into public_html. The site expects public/ inside the project folder.
6. Run the web installer
Open https://your-domain.com. On this first visit the site creates .env from .env.example with an application key, then opens the installer at /install. It has five steps:
- Welcome: what you need. Click Start installation.
- Requirements: PHP version, extensions and writable folders. Everything must show OK; fix anything red in cPanel and press Check again.
- Database: host
127.0.0.1(if that fails,localhost), port3306, and the database name, user and password from step 3. The connection is tested first. If the database already has tables, the installer warns you and asks before deleting them. Then a progress bar shows the tables and default data being created (one to two minutes; keep the page open). - Admin account: website name, your name, email and password (8+ characters).
- Done: the installer locks itself. Sign in with the email and password you chose.
If the page says .env could not be created, create it yourself: in File Manager copy .env.example, rename the copy to .env, and reload. The key is still added automatically.
7. Add the cron job
Cron Jobs → Once Per Minute, command (replace USERNAME with your cPanel user name):
/usr/local/bin/php /home/USERNAME/jobnect/artisan schedule:run >> /dev/null 2>&1It re-checks online payments and sends interview reminders.
8. Check
- Sign in at
/loginand open : site name, currency, time zone, home country. - Set up and send a test email.
- Live chat works without extra setup on shared hosting (it refreshes every 10 seconds).
- Work through the Go-Live Checklist.
Updates without terminal access
Use and upload the new release ZIP (see Updating). If your host blocks the upload, extract the release on your computer, upload the files with File Manager (keep .env, vendor, storage and public/uploads), sign in as admin and click Finalize manual update. If a release’s notes say its PHP packages changed, also upload that release’s vendor folder over yours.
nginx Configuration
/etc/nginx/sites-available/jobnect, then sudo ln -s /etc/nginx/sites-available/jobnect /etc/nginx/sites-enabled/, sudo nginx -t and sudo systemctl reload nginx. Certbot adds the SSL lines for you (SSL).
server {
    listen 80;
    server_name your-domain.com www.your-domain.com;
    root /var/www/jobnect/public;
    index index.php;

    client_max_body_size 128M;   # update ZIPs are ~50 MB
    charset utf-8;

    location / {
        try_files $uri $uri/ /index.php?$query_string;
    }

    # Live chat: Reverb WebSocket server (see Supervisor below)
    location ~ ^/(app|apps)/ {
        proxy_pass http://127.0.0.1:8080;
        proxy_http_version 1.1;
        proxy_set_header Host $host;
        proxy_set_header Upgrade $http_upgrade;
        proxy_set_header Connection "Upgrade";
        proxy_set_header X-Real-IP $remote_addr;
        proxy_set_header X-Forwarded-For $proxy_add_x_forwarded_for;
        proxy_set_header X-Forwarded-Proto $scheme;
        proxy_read_timeout 120s;
    }

    location ~ \.php$ {
        fastcgi_pass unix:/run/php/php8.3-fpm.sock;
        fastcgi_param SCRIPT_FILENAME $realpath_root$fastcgi_script_name;
        include fastcgi_params;
        fastcgi_read_timeout 180;
    }

    location ~ /\.(?!well-known).* {
        deny all;
    }
}
Apache Configuration
JobNect includes the standard Laravel public/.htaccess, so Apache only needs the document root and AllowOverride All. Enable the modules first:
sudo a2enmod rewrite proxy proxy_http proxy_wstunnel headers ssl<VirtualHost *:443>
ServerName your-domain.com
DocumentRoot /var/www/jobnect/public
<Directory /var/www/jobnect/public>
AllowOverride All
Require all granted
</Directory>
# Live chat: Reverb WebSocket server on 127.0.0.1:8080
ProxyPreserveHost On
RewriteEngine On
RewriteCond %{HTTP:Upgrade} websocket [NC]
RewriteCond %{HTTP:Connection} upgrade [NC]
RewriteRule ^/?(app|apps)/(.*)$ ws://127.0.0.1:8080/$1/$2 [P,L]
ProxyPass /apps/ http://127.0.0.1:8080/apps/
ProxyPassReverse /apps/ http://127.0.0.1:8080/apps/
SSLEngine on
SSLCertificateFile /etc/letsencrypt/live/your-domain.com/fullchain.pem
SSLCertificateKeyFile /etc/letsencrypt/live/your-domain.com/privkey.pem
</VirtualHost>The Reverb lines are only needed if you run live chat in real time; without them the chat refreshes every 10 seconds.
Supervisor for Reverb
Supervisor keeps the live-chat server running and restarts it after a crash or reboot.
sudo apt install supervisor
sudo nano /etc/supervisor/conf.d/jobnect-reverb.conf
[program:jobnect-reverb]
command=php /var/www/jobnect/artisan reverb:start --host=127.0.0.1 --port=8080
directory=/var/www/jobnect
user=www-data
autostart=true
autorestart=true
redirect_stderr=true
stdout_logfile=/var/www/jobnect/storage/logs/reverb.logsudo supervisorctl reread
sudo supervisorctl update
sudo supervisorctl statusIn .env set the public address browsers connect to, then clear the cache and restart Reverb:
BROADCAST_DRIVER=reverb
REVERB_HOST=your-domain.com
REVERB_PORT=443
REVERB_SCHEME=https
php artisan optimize:clear
sudo supervisorctl restart jobnect-reverbCheck in the admin panel: the Status box shows the real-time server address.
Cron and the Scheduler
One cron entry runs the Laravel scheduler every minute:
* * * * * php /var/www/jobnect/artisan schedule:run >> /dev/null 2>&1Scheduled task: payments:reconcile every five minutes. You can also run it by hand to check pending payments right away:
php artisan payments:reconcileNo queue worker is needed: the default QUEUE_CONNECTION=sync sends mail during the request.
SSL (HTTPS)
Use HTTPS in production. The mobile app, live chat over wss://, Google login and most payment gateways expect it.
- cPanel: SSL/TLS Status → run AutoSSL, or install a certificate from your host.
- VPS: Let’s Encrypt with Certbot:
sudo apt install certbot python3-certbot-nginx
sudo certbot --nginx -d your-domain.com -d www.your-domain.com
Then set APP_URL=https://your-domain.com in .env and run php artisan optimize:clear.
Domain and Moving Sites
Point the domain’s DNS A record to your server’s IP address (and www as a CNAME or second A record). When you move JobNect to a new domain:
- Update
APP_URL(andREVERB_HOSTif you use Reverb) in.env, thenphp artisan optimize:clear. - Update the webhook URLs in each payment gateway dashboard and the Google OAuth redirect URI.
- Change
AppConfig.apiHostin the app and publish an app update.
.env Reference
| Key | Meaning |
|---|---|
APP_URL | Your full address with https, no trailing slash |
APP_ENV / APP_DEBUG | production / false on a live site (the defaults in .env.example) |
APP_DEMO | Keep false. true turns on demo-site behaviour (one-click demo logins, Customize panel for visitors). |
APP_INSTALLED | Set to yes by the installer |
DB_* | Database connection, written by the installer |
JWT_SECRET | Signs mobile app logins; created by the installer |
BROADCAST_DRIVER, REVERB_* | Live chat server; keys created by the installer, host/port/scheme set by you |
QUEUE_CONNECTION | sync (default, recommended) |
MAIL_* | Fallback mail values; set mail in the admin panel under Settings → Mail Settings |
Run php artisan optimize:clear after every change to .env.
Backups
Back up two things: the database, and the files that are not in the download (.env and public/uploads/).
# database
mysqldump -u jobnect -p --single-transaction jobnect > jobnect-$(date +%F).sql

# files
tar -czf jobnect-files-$(date +%F).tar.gz -C /var/www/jobnect .env public/uploads
Run these daily from cron and copy the results off the server (another server, object storage, or your computer). On cPanel you can also use Backup / Backup Wizard. The admin panel’s page downloads a SQL dump of the database for a quick manual copy; for scheduled backups prefer mysqldump.
Restore
mysql -u jobnect -p jobnect < jobnect-2026-11-07.sql
tar -xzf jobnect-files-2026-11-07.tar.gz -C /var/www/jobnect
php artisan optimize:clear
Go-Live Checklist
- HTTPS works and
APP_URLuses https. APP_ENV=production,APP_DEBUG=false,APP_DEMO=false.- Mail test sent from Settings → Mail Settings arrives.
- Cron job runs (check that pending payments get completed).
- Each payment gateway tested in test mode, then switched to live with live keys.
- Logo, favicon and app logos uploaded; theme chosen.
- Backups scheduled and a restore tested once.
- Mobile app built with your
apiHost, package ID, name, icons and signing key.