Website & Admin Panel
Install, configure and run the JobNect website and admin panel
Overview
JobNect is a job portal and recruitment system: a Laravel 13 website with a full admin panel, plus one Flutter mobile app. Job seekers search and apply, employers post jobs and manage applicants, and both can work together in a built-in freelance marketplace with escrow payments. You run everything from one admin panel.
This page covers installing and running the website and admin panel. The mobile app has its own page, Mobile App; hosting details (cPanel, VPS, web server samples, SSL, backups) are on Server Setup. In a hurry? Start with the Quick Start.
Features at a Glance
Website
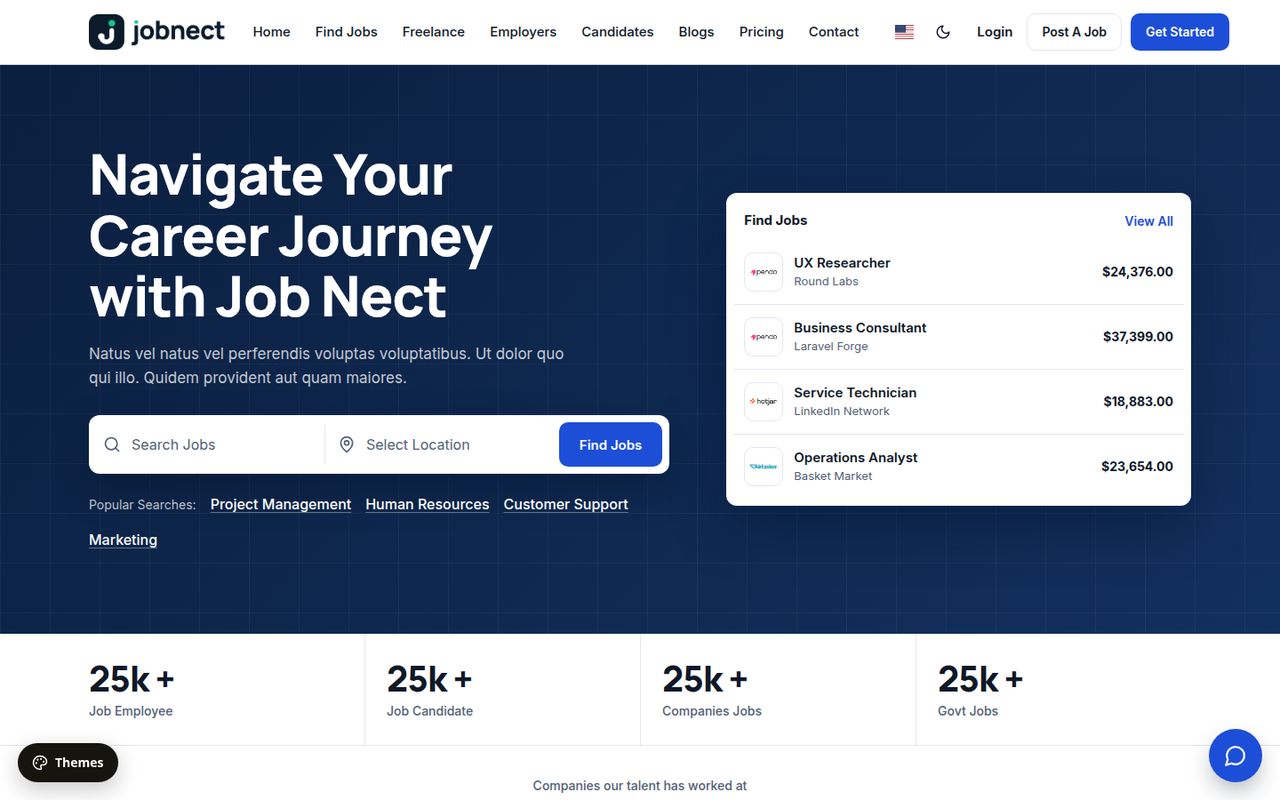
- 5 complete frontend themes: Classic, Vista, Spotlight, Momentum and Meridian. Momentum and Meridian restyle every page (home, jobs, job details, employers, candidates, blog, categories, pricing, contact, about, privacy, terms, login and register).
- Customize panel: theme, accent colour, font pair, corner radius, text size, light/dark mode. Admins can make a design live for every visitor.
- Job Hub search: category, location (world countries, states and cities), job type, salary, sector (private, government, semi-government, NGO), age range and experience, plus quick links such as Govt jobs, Overseas, New today, Closing soon, Fresher, Part time and Internship.
- Job details with apply modal and job location map, company and candidate directories, blog, pricing plans, contact form and CMS pages.
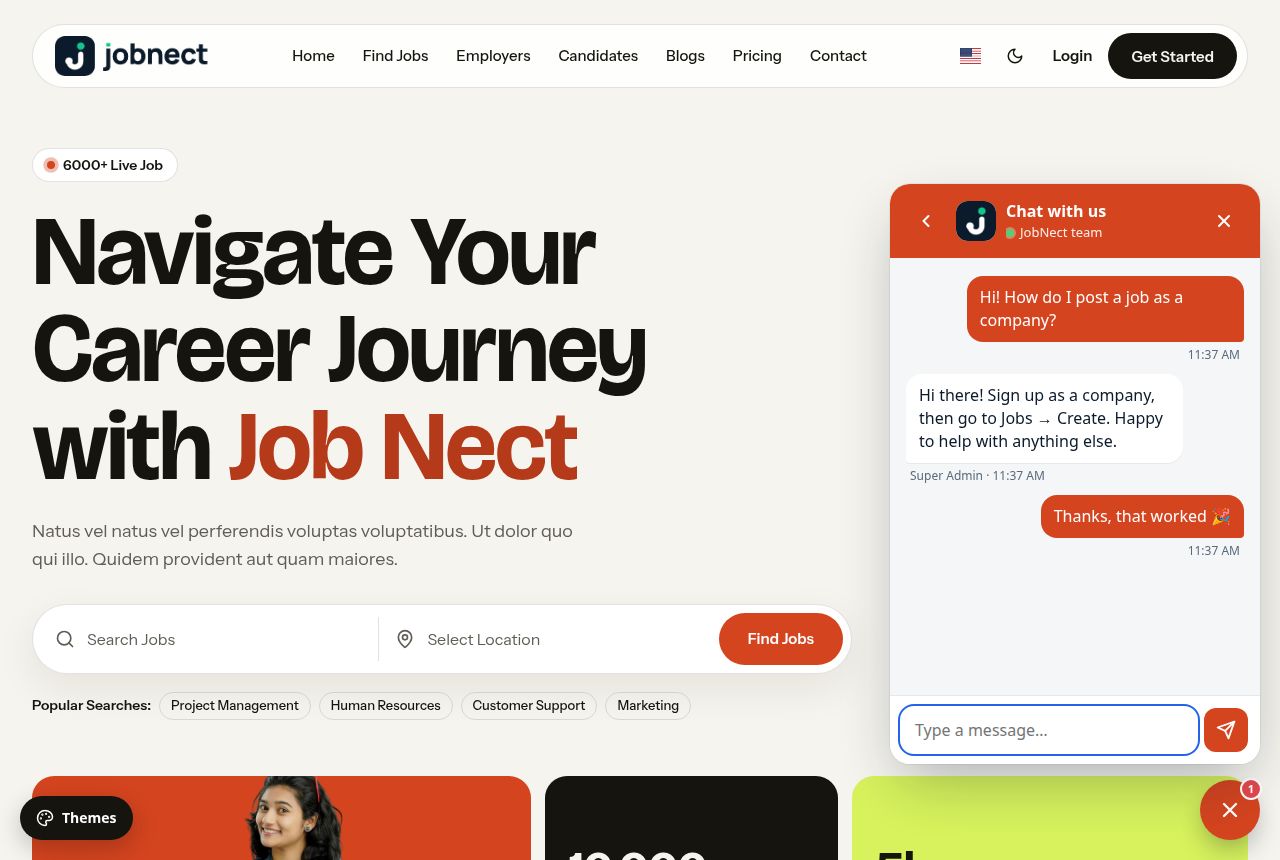
- Live support chat (real time with Laravel Reverb, falls back to polling) with WhatsApp and Facebook Messenger buttons.
Job seekers
- Register and log in (email verification code, optional Google login), profile and resume builder (education, experience, skills, social links), resume PDF download.
- Apply with CV, bookmarks, follow companies, applied-job status, profile visits, notifications, KYC verification upload.
Employers
- Company profile with gallery and location, post and manage jobs, applicants per job with status, followers.
- Hiring pipeline: a Kanban board per job (Applied, Viewed, Shortlisted, Interview, Offered, Hired / Not selected), interview invitations with reminders, private notes and 1–5 ratings.
- Subscription plans with online checkout or bank transfer.
Freelance marketplace and wallet
- Companies and candidates post projects (fixed or hourly budget); candidates send proposals; shortlist, decline or hire.
- Contracts with milestones and escrow (fund, submit, request revision, approve and release) with a platform commission; disputes resolved by the admin; per-contract chat; two-way reviews.
- Wallet with balance, escrow, pending and earned totals, full ledger, manual deposits (admin approves), online top-up and withdrawal requests.
Payments
- 10 online gateways for wallet top-up and plan purchase. India: Razorpay, Cashfree, PhonePe, Paytm. International: Stripe, PayPal, Flutterwave, Mollie, Paddle, 2Checkout. Plus bank transfer.
- Per-gateway on/off, test or live mode, charge currency and conversion rate, encrypted credentials, webhook URLs, server-side verification and a scheduled reconcile job.
Admin panel
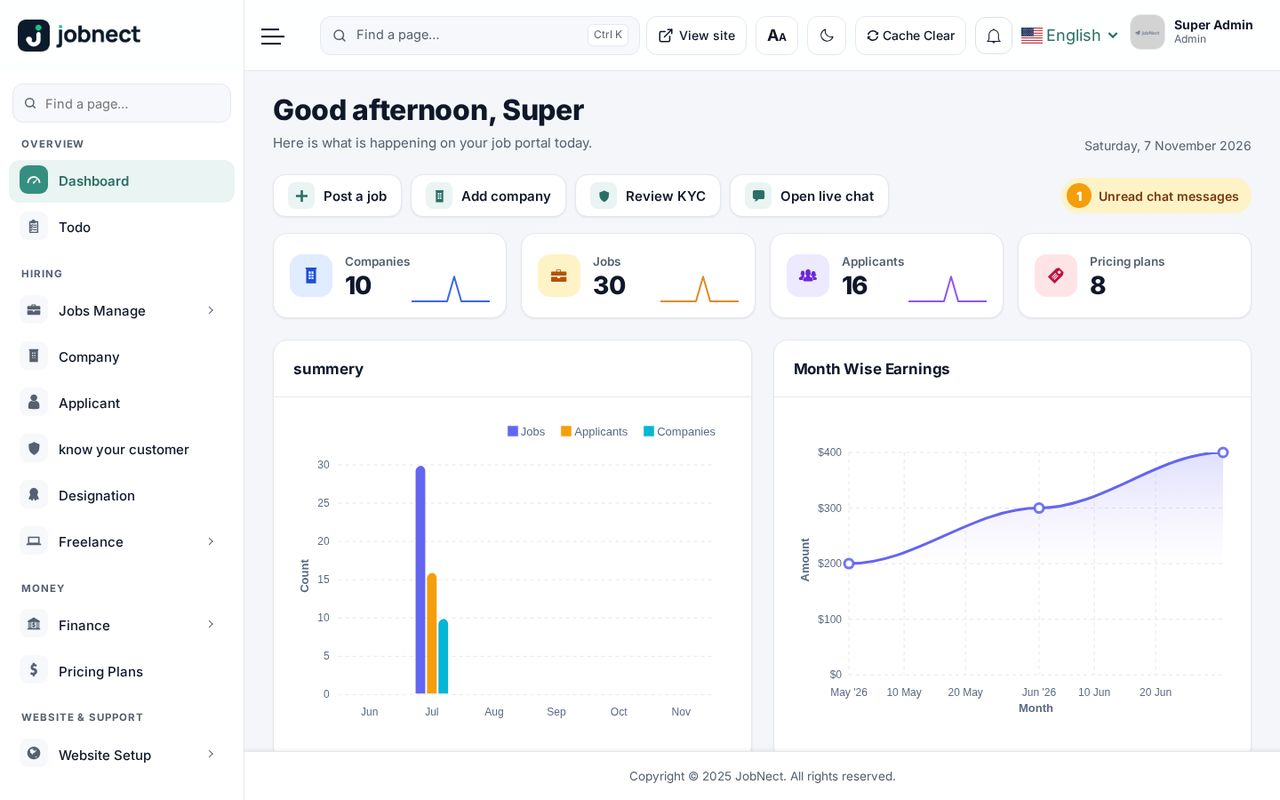
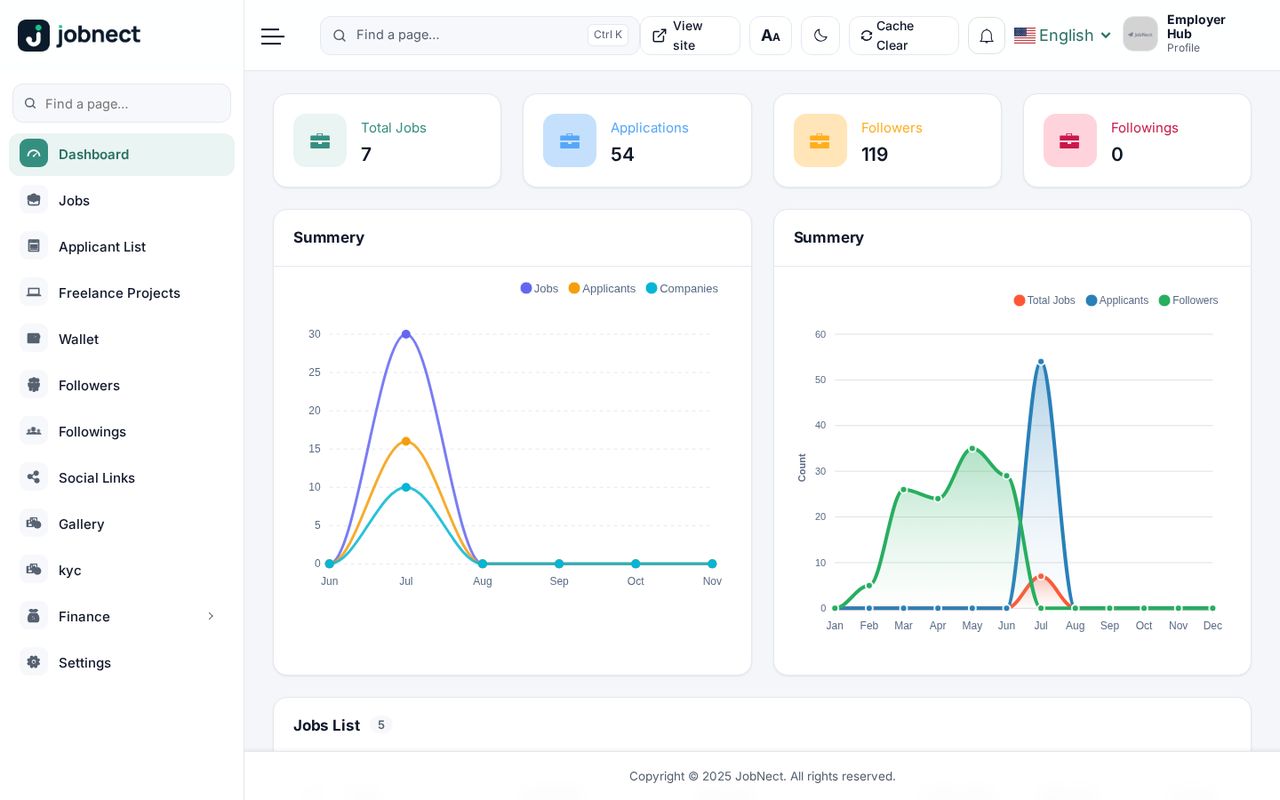
- Grouped sidebar with search, Ctrl+K command palette, text-size control, dashboard KPIs with sparklines and "needs attention" items, notification bell.
- Manage jobs, categories, companies, candidates, applications, KYC, plans and subscriptions, payments, freelance, blog, pages, testimonials, homepage sections and widgets, languages and phrases, roles and staff, settings.
Mobile app
- Job seeker: onboarding, sign up and login, home feed, search and filters, job details, apply with CV, saved jobs, companies, profile and resume, KYC, notifications, freelance and wallet.
- Employer: dashboard, post and edit jobs (rich text), applicants, company profile and map location, subscription checkout, notifications, freelance.
Languages: English, Bangla, Spanish and Hebrew (right-to-left) are set up after installation. You can add more languages and edit every phrase from the admin panel.
What’s in the Download
| Folder | Contents |
|---|---|
Main_Files/WebSourceCode/ | The Laravel website and admin panel. Upload this to your server. |
Main_Files/AppSourceCode/ | The Flutter project for the mobile app (Android and iOS). |
Main_Files/Documentation/ | This documentation. Open index.html in any browser; it works offline. |
vendor/ (the PHP packages, production build) is included in WebSourceCode, so you do not need Composer or a terminal to install. Signing keys for the app are not included either: you create your own.
Server Requirements
| Item | Requirement |
|---|---|
| PHP | 8.3 or newer |
| PHP extensions | bcmath, ctype, curl, fileinfo, gd, intl, json, mbstring, openssl, pdo_mysql, mysqli, tokenizer, xml, zip |
| PHP settings | allow_url_fopen = On and a date.timezone value set in php.ini (recommended). For the install step allow at least 120 s execution time and 256 MB memory; for one-click System Update, 300 s and an upload limit (upload_max_filesize, post_max_size) of at least 64 MB. |
| Database | MySQL 8 or MariaDB 10.6+, an empty database with utf8mb4 |
| Web server | Apache (mod_rewrite) or nginx; the domain must point to the public/ folder |
| Tools | Composer 2 (SSH access, or cPanel Terminal) |
| Optional | Supervisor (to keep the live-chat server running), SSL certificate (required for live chat over wss and for most payment gateways) |
The installer’s Requirements step checks the PHP version, every extension above and the writable folders. Fix anything shown in red before you continue.
Installation
This is the exact flow we test on a blank server. It takes about ten minutes. Step-by-step guides for each kind of hosting are in Server Setup:
- Install with terminal access — a VPS, or cPanel with Terminal / SSH.
- Install without terminal access — cPanel with File Manager only; no commands needed.
1. Create the database
Create an empty MySQL database and a database user with all privileges on it (cPanel: MySQL Databases; see Server Setup).
Use a new, empty database for JobNect. If the database already has tables, the installer warns you and deletes them only after you confirm.
2. Upload the files
Upload the contents of WebSourceCode to your server, for example to /var/www/jobnect, and point the
domain’s document root to its public/ folder. Do not move files out of public/.
3. PHP packages (nothing to do)
vendor/ is included in WebSourceCode, so Composer is not needed.
4. The .env file and the app key (automatic)
Nothing to do: on the first visit the site copies .env.example to .env and adds an application key, and the installer later writes the database details and your site address (APP_URL). If you prefer to do it yourself:
cp .env.example .env
php artisan key:generate
5. Make folders writable
chmod -R 775 storage bootstrap/cache public/uploads
chown -R www-data:www-data storage bootstrap/cache public/uploads .env   # your web-server user
On cPanel PHP runs as your own user, so this is usually not needed. The installer also creates the public/storage link; run php artisan storage:link only if your host blocks it.
6. Run the web installer
Open your domain in the browser. A site that is not installed yet redirects to /install. Continue with
Web Installer below.
7. Add the cron job
* * * * * php /var/www/jobnect/artisan schedule:run >> /dev/null 2>&1This runs the scheduler every minute. It re-checks online payments every five minutes, so a payment still completes if the buyer closes the browser before returning to your site.
Web Installer
The installer at /install has five steps:
- Welcome: what you need. Click Start installation.
- Requirements: PHP version, extensions and writable folders. Continue is enabled only when everything shows OK.
- Database: host (usually
127.0.0.1), port (3306), database name, user and password. The connection is tested before anything is saved. If the database already has tables, the installer shows how many and asks before deleting them. A progress bar then shows the tables and default data being created, including about 156,000 world cities (one to two minutes; keep the page open). - Admin account: website name, your first and last name, email and password (8+ characters).
- Done: the installer is locked and shows the cron line to add. Sign in at
/login.
Along the way it writes the database values and your site address (APP_URL) to .env, fills in JWT_SECRET (used by the mobile app) and the Reverb keys (used by live chat) if they are empty, creates the public/storage link, and finally sets APP_INSTALLED=yes. After that /install no longer runs on an installed site.
If the browser or your host stops waiting during the database step, the install keeps running on the server and the page picks it up again. If it fails, the page shows the reason and a Try again button, which starts over from a clean database.
A fresh install has no demo jobs, companies or candidates. You get your administrator account, the default website content and settings, and the world location data. The demo accounts you may have seen on the live preview exist only on the demo site.
First Login and First Steps
Go to https://your-domain.com/login and sign in with the email and password you entered in the installer. You land on the admin dashboard.
Recommended order:
- : site name, contact details, currency, date format, and the Branding images.
- : SMTP. Registration sends an email verification code, so mail must work before you open sign-ups (Mail).
- : pick a theme (Themes).
- , : your categories and employer plans.
- and : online payments and bank transfer (Payments).
- Optional: live chat, Google login, reCAPTCHA, languages.
Server Setup Essentials
Document root
The domain must serve the public/ folder. Everything else (.env, storage/, source code) stays outside the web root. Ready-made Apache and nginx configurations are on Server Setup.
Writable folders
The web-server user must be able to write to storage/, bootstrap/cache/ and public/uploads/ (all uploaded logos, photos, CVs and documents go there). During installation it also needs to write .env.
Storage link
php artisan storage:linkScheduler (cron)
* * * * * php /var/www/jobnect/artisan schedule:run >> /dev/null 2>&1The scheduled task is payments:reconcile, every five minutes. It checks pending online payments with the gateway and completes them if they were paid.
Queue
JobNect ships with QUEUE_CONNECTION=sync: emails and notifications are sent during the request, so no queue worker is needed. Keep it that way unless you know you need a queue.
If you do switch to a queue, use Redis. Do not use the database queue driver: its default table is called jobs, and JobNect already uses a table with that name for job posts.
After changing .env
php artisan optimize:clearRun this whenever you edit .env or upload new files, so cached configuration and views are rebuilt.
Live Chat and Reverb
Visitors can message you from any page through the chat button. You answer in , with unread badges and seen status. The same widget can show WhatsApp and Facebook Messenger buttons.
Settings
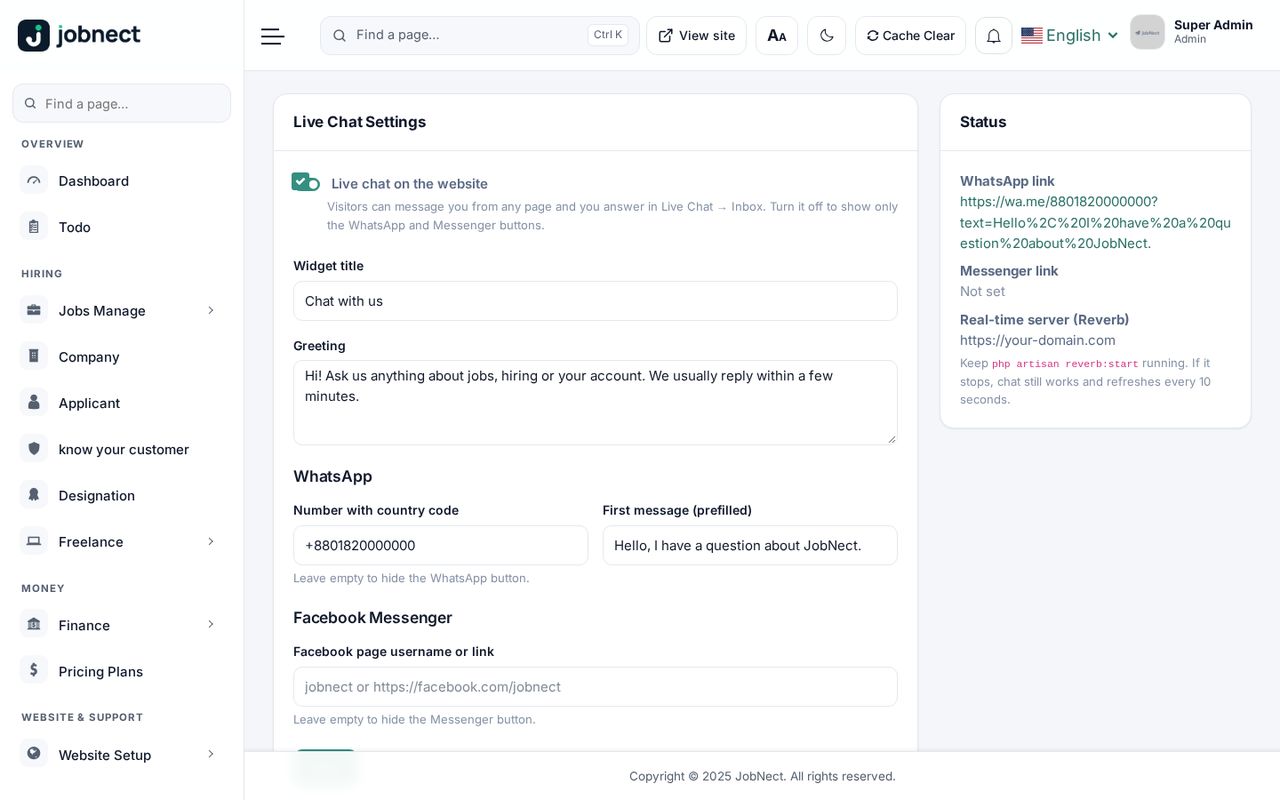
: turn the chat on or off, set the widget title and greeting, a WhatsApp number (with country code) and first message, and a Facebook page username or link. Leave WhatsApp or Messenger empty to hide that button. The Status box shows whether the real-time server is configured.
Real time with Laravel Reverb
Without a socket server the chat still works: it refreshes every 10 seconds. For instant messages run Reverb, the WebSocket server that ships with Laravel. The installer already generated REVERB_APP_ID, REVERB_APP_KEY and REVERB_APP_SECRET.
- Point the public values at your domain in
.env(browsers connect to these):
then runBROADCAST_DRIVER=reverb REVERB_HOST=your-domain.com REVERB_PORT=443 REVERB_SCHEME=httpsphp artisan optimize:clear. - Keep the Reverb server running with Supervisor, for example
/etc/supervisor/conf.d/jobnect-reverb.conf:[program:jobnect-reverb] command=php /var/www/jobnect/artisan reverb:start --host=127.0.0.1 --port=8080 directory=/var/www/jobnect user=www-data autostart=true autorestart=true redirect_stderr=true stdout_logfile=/var/www/jobnect/storage/logs/reverb.logsudo supervisorctl reread sudo supervisorctl update sudo supervisorctl status jobnect-reverb - Proxy the WebSocket paths
/appand/appsfrom your HTTPS site to Reverb. nginx, inside your existingserver { ... }block for port 443:
An Apache version is on Server Setup.location ~ ^/(app|apps)/ { proxy_pass http://127.0.0.1:8080; proxy_http_version 1.1; proxy_set_header Host $host; proxy_set_header Upgrade $http_upgrade; proxy_set_header Connection "Upgrade"; proxy_set_header X-Real-IP $remote_addr; proxy_set_header X-Forwarded-For $proxy_add_x_forwarded_for; proxy_set_header X-Forwarded-Proto $scheme; proxy_read_timeout 120s; }
After you change any REVERB_ value, run php artisan optimize:clear and sudo supervisorctl restart jobnect-reverb.
Shared hosting usually cannot run a long-lived process like Reverb. That is fine: leave the Reverb settings as they are and the chat works by refreshing every 10 seconds.
Website Themes
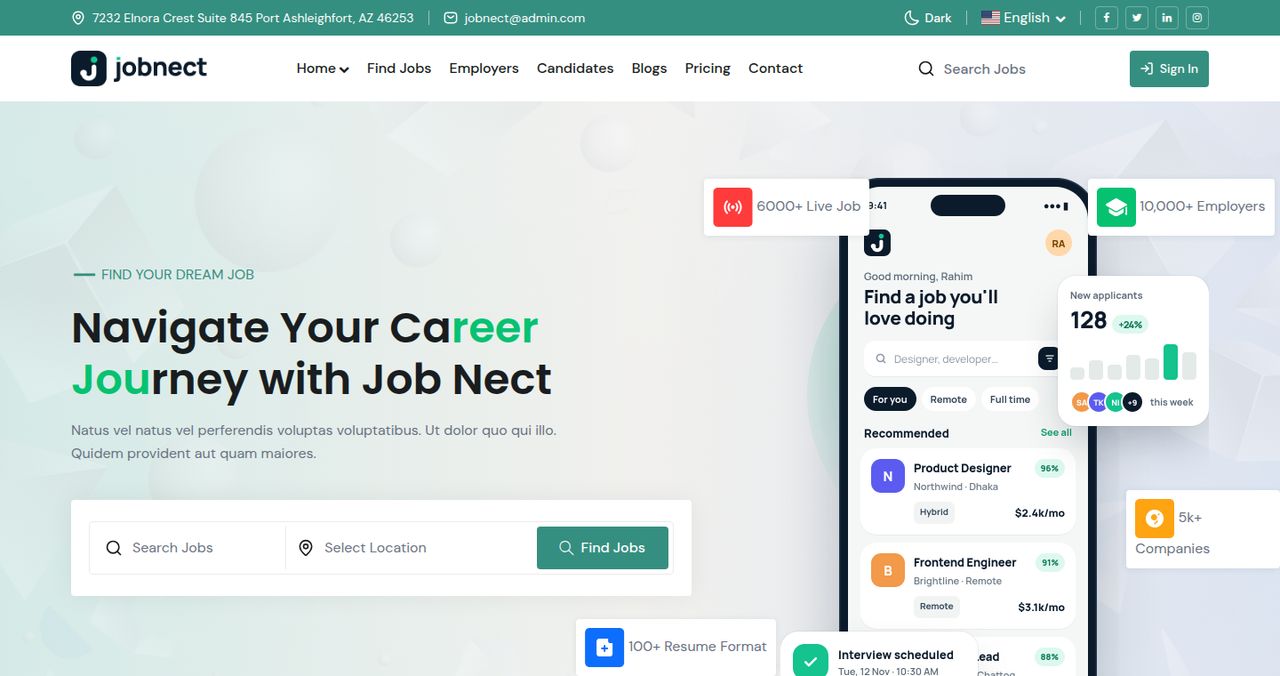
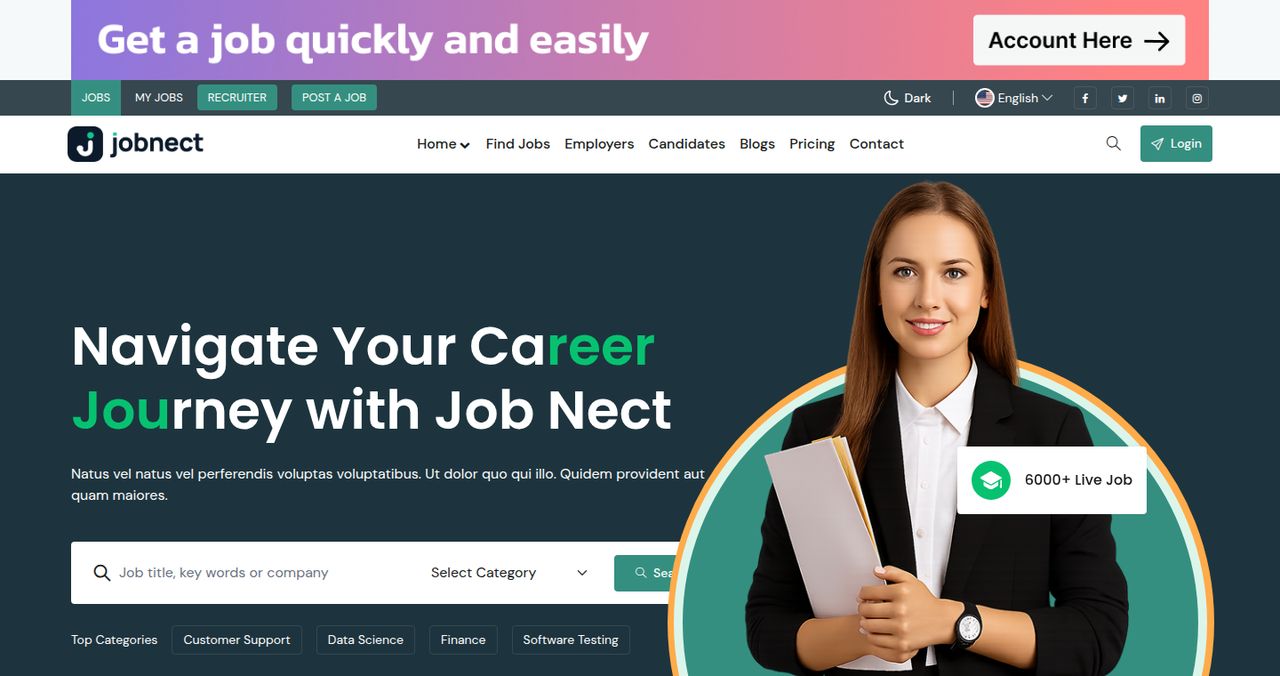
JobNect has five complete themes. Choose one in : Preview opens the site in that theme for you only, Apply makes it the site theme for everyone. When you apply a theme you can also take over its colours and fonts.
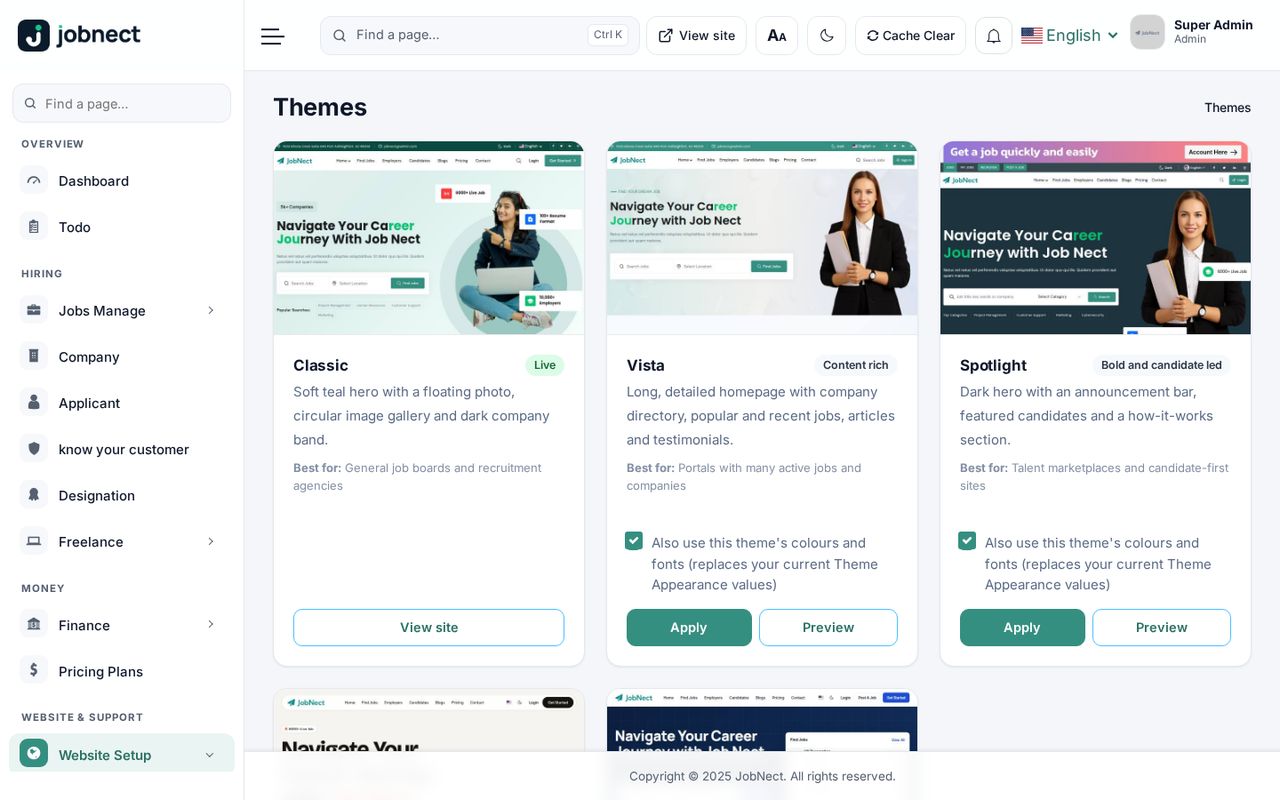
| Theme | Style | Best for |
|---|---|---|
| Classic | Soft teal hero with a floating photo, circular image gallery, dark company band | General job boards and recruitment agencies |
| Vista | Long, content-rich homepage with company directory, popular and recent jobs, articles and testimonials | Portals with many active jobs and companies |
| Spotlight | Dark hero with an announcement bar, featured candidates and a how-it-works section | Talent marketplaces and candidate-first sites |
| Momentum | Warm paper canvas, oversized type, floating pill navigation and a bento hero; restyles every page | Startups, tech hiring and modern employer brands |
| Meridian | Navy and cobalt, live job panel in the hero, clean scannable job rows; restyles every page | Corporate careers and established job portals |


The same page has a Mobile app theme section: pick Classic, Momentum or Meridian for the mobile app, or let it follow the website theme. See App Themes.
The homepage content of each theme (hero texts, counters, sections, footer) is edited in and . Colours, fonts and corner radius are in .
Customize Panel
When you are logged in as an administrator, a Customize button appears at the bottom-left of the website. It opens a panel where you try out:
- Theme (Classic, Vista, Spotlight, Momentum, Meridian)
- Mode: light or dark
- Accent colour (a set of colours that all keep white button text readable)
- Font pair: Theme default, Modern, Friendly, Geometric, Bold, Editorial, System
- Text size (A−, A, A+, A++) and corners (Sharp, Soft, Round)
Changes are a preview for you only. Click Make … live (or Save as site design) to save the appearance for all visitors. Exit preview returns to the saved design.
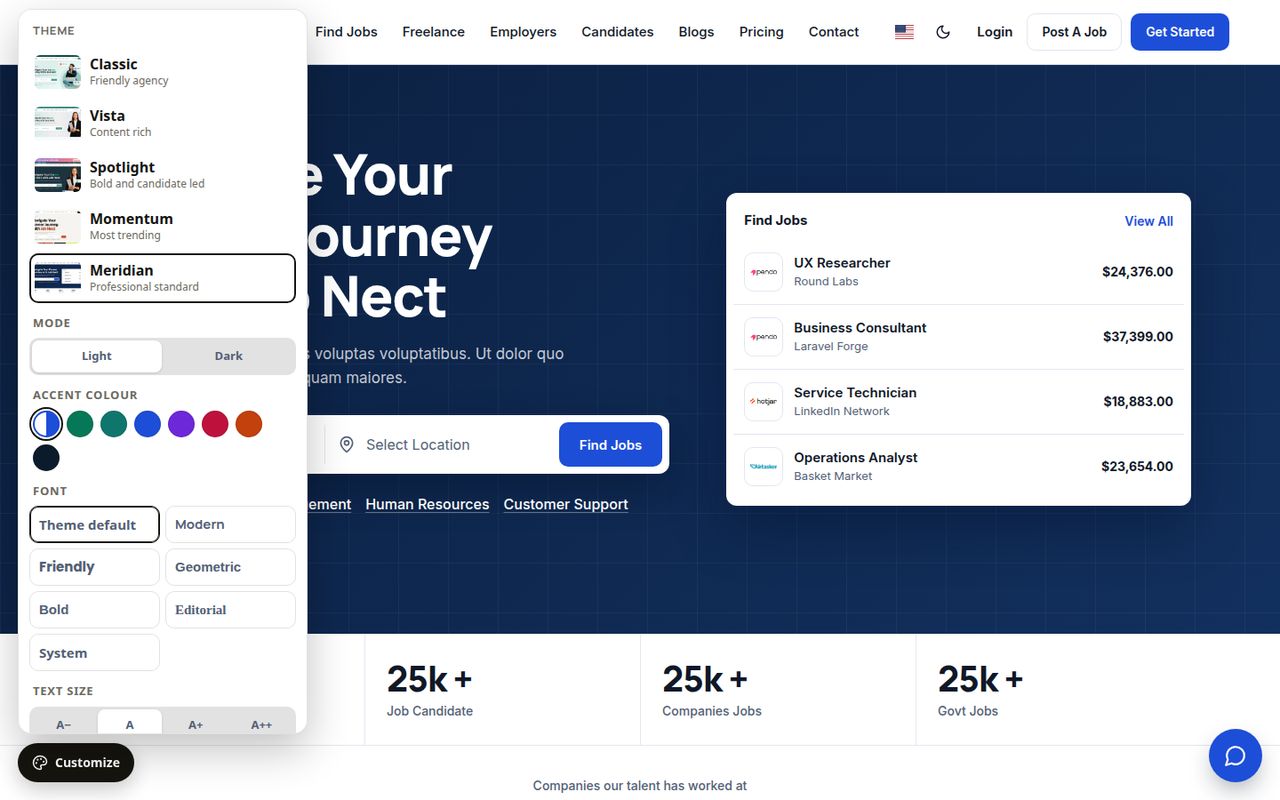
Visitors never see the panel on your site. It is only shown to everyone on a site running in demo mode (APP_DEMO=true), which is how the live preview works; keep APP_DEMO=false on your own site.
Branding: Logo and Favicon
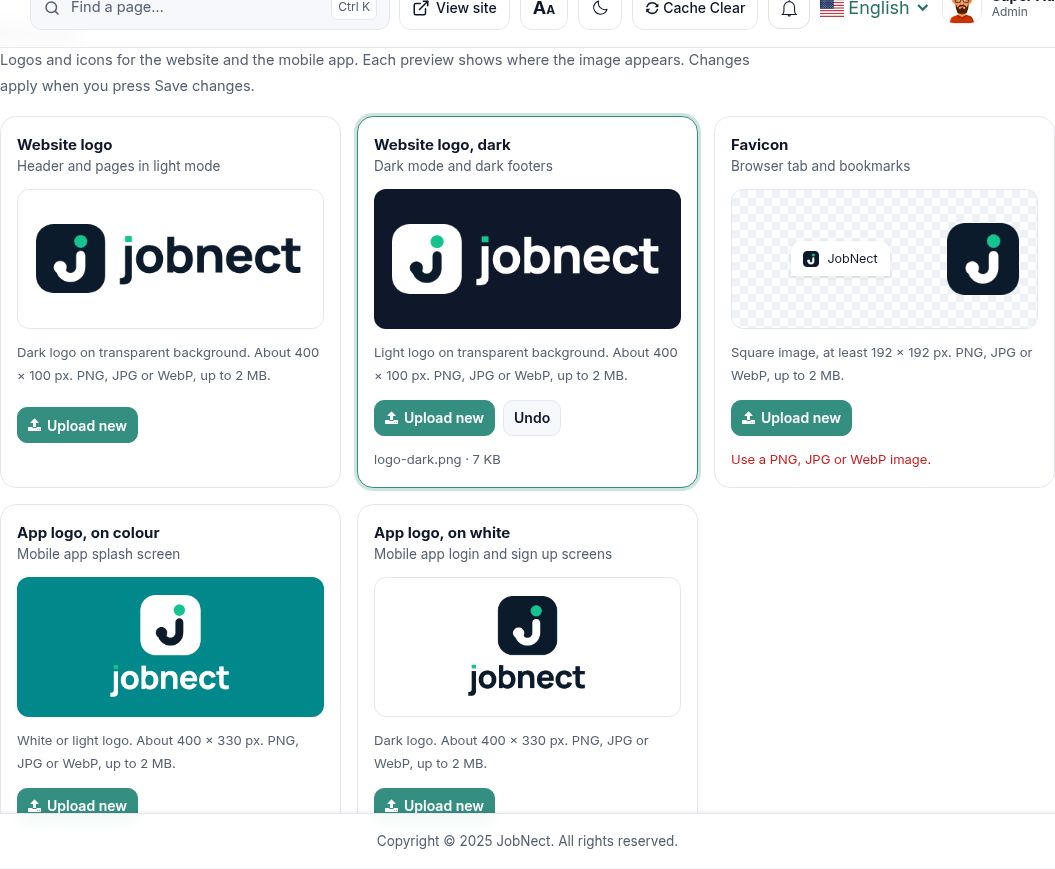
has a Branding section with one card per image. Each preview sits on the background where the image is actually used, so you can judge a white logo on a dark background.
| Image | Where it appears | Recommended |
|---|---|---|
| Website logo | Header and pages in light mode | Dark logo on transparent background, about 400 × 100 px |
| Website logo, dark | Dark mode and dark footers | Light logo on transparent background, about 400 × 100 px |
| Favicon | Browser tab and bookmarks | Square, at least 192 × 192 px |
| App logo, on colour | Mobile app splash screen | White or light logo, about 400 × 330 px |
| App logo, on white | Mobile app login and sign-up screens | Dark logo, about 400 × 330 px |
PNG, JPG or WebP, up to 2 MB each. Changes apply when you press Save changes. The mobile app downloads these logos from your site, so you change them here, not in the app code.
Homepage, Pages and Blog
- : texts and images of the homepage sections and of inner-page headers.
- : which sections appear, in what order and with which spacing, for each theme.
- : About, Privacy Policy, Terms and other CMS pages.
- and .
- : blog categories and posts. : messages sent from the contact form. : the onboarding slides of the mobile app.
- : meta title, description and keywords.
- : map provider for job and company locations. OpenStreetMap is free and needs no key; Google Maps needs an API key with billing.
Jobs and Job Hub Search
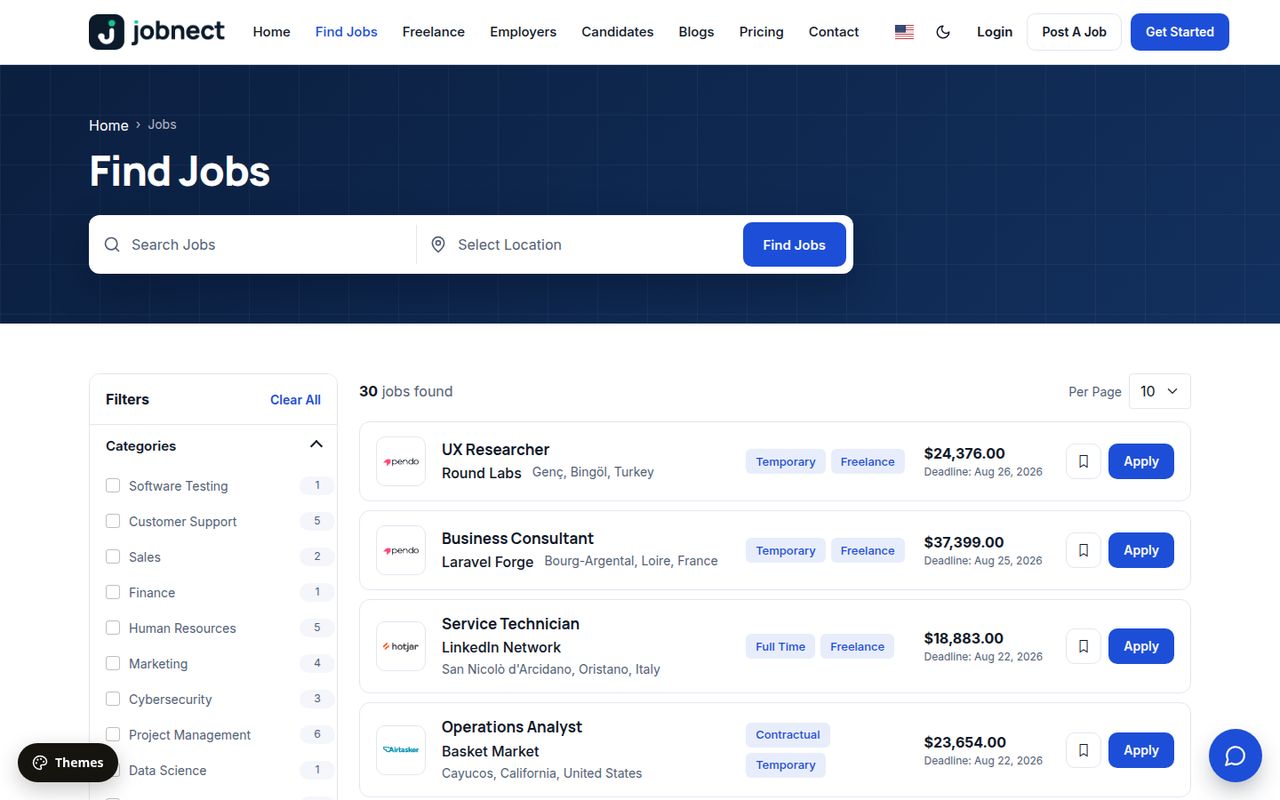
The jobs page is a full search with filters. Job seekers filter by keyword, category, location (country, state, city), job type, salary, sector (Private, Government, Semi-government, NGO), age limit, experience, overseas and deadline, and use quick links such as Govt jobs, Overseas jobs, New today, Closing soon, Fresher jobs, Part time and Internship. The home page of the themes can show a stats bar (live jobs, vacancies, companies, new today) and jobs by location (see Using JobNect in Any Country).
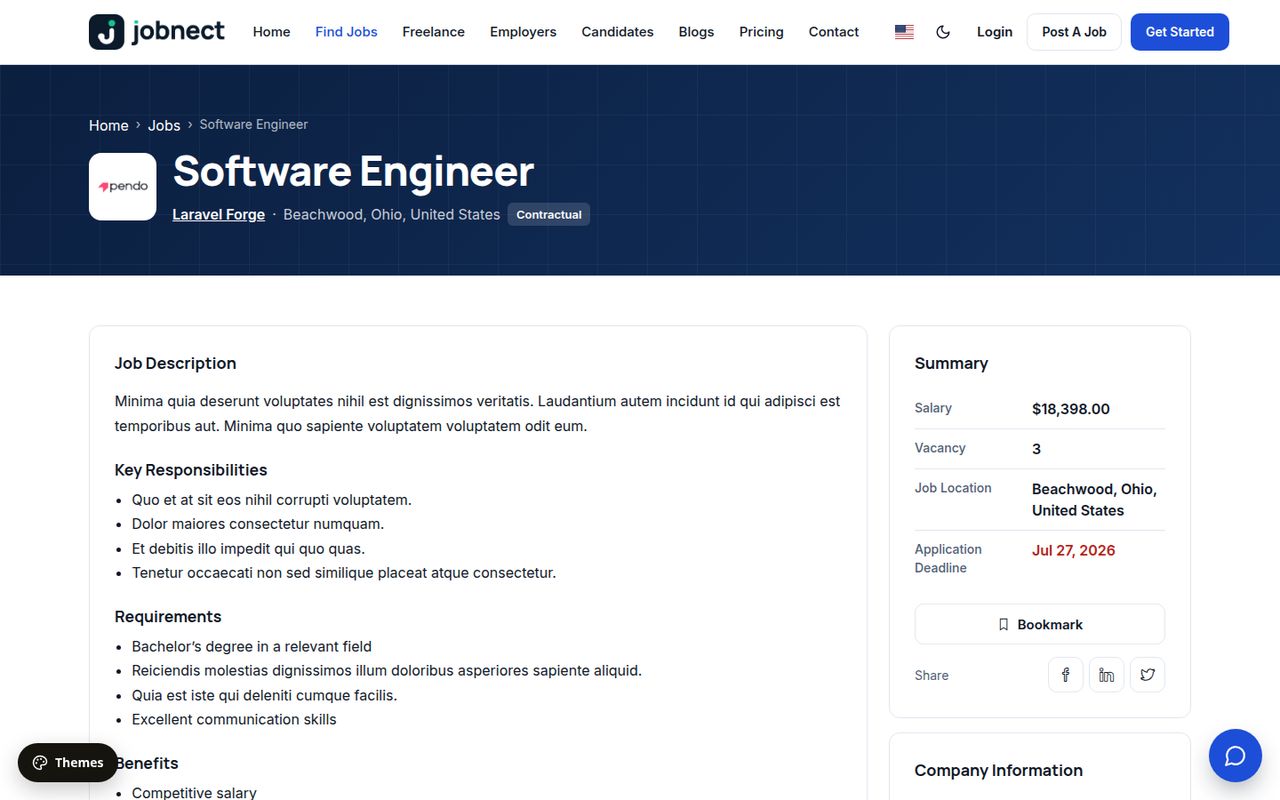
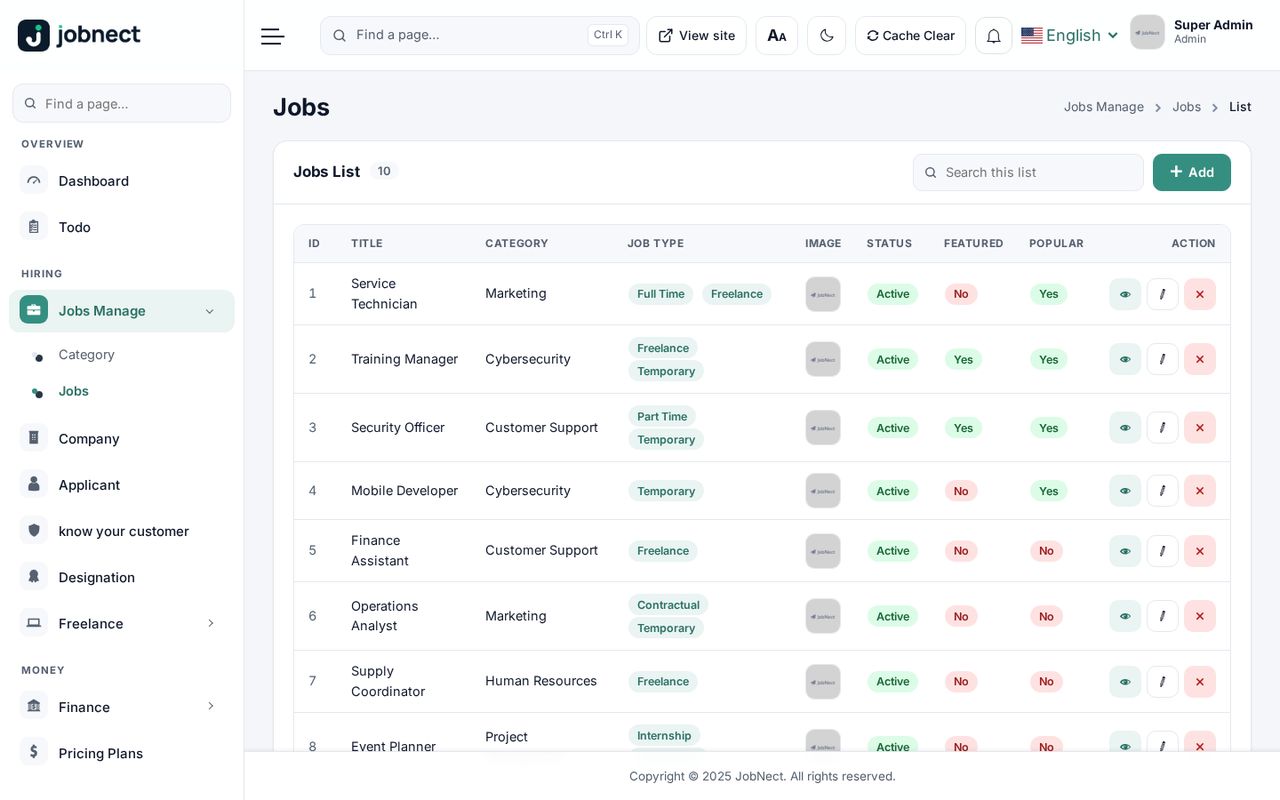
Employers post jobs from their dashboard (or the app); admins manage all jobs in , with categories in . Sector, age limit and experience range are fields on each job. The REST API (/api/v10) accepts the same filters; the mobile app's filter screen offers category, job type and skills.
Locations
holds countries, states and cities (about 156,000 cities are installed). Switch off the places you do not serve, or import more under .
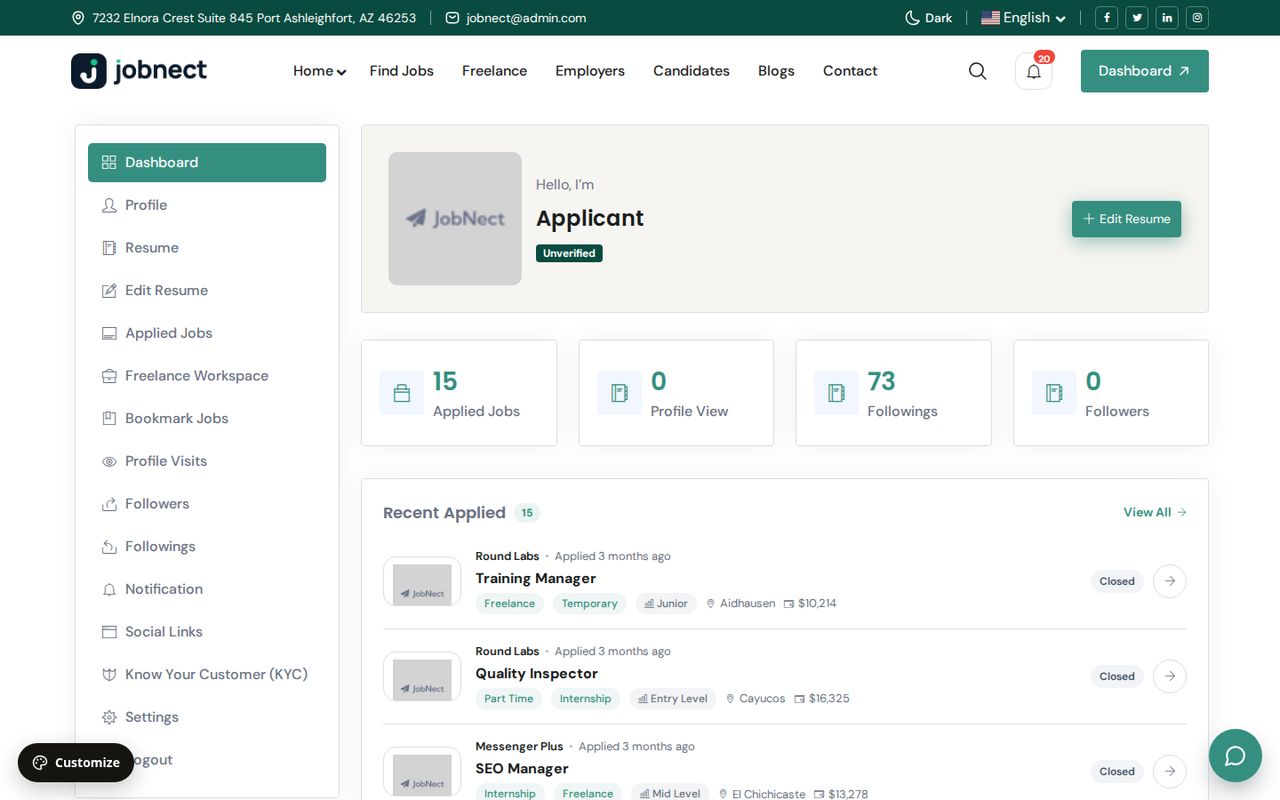
Job Seekers and Employers
People register on the website or in the app as a job seeker or as a company. Registration sends a verification code by email. Each account type gets its own dashboard.
Job seekers
Profile and resume (education, experience, skills, languages, social links), resume PDF download, applied jobs with status and deadline, bookmarks, followed companies, profile visits, notifications, freelance workspace and KYC verification.
Employers
Company profile with logo, cover, gallery and map location; post, edit and close jobs; applicants per job with status; followers; subscription plan checkout; freelance projects; KYC.
Admin side
and list every account. lists KYC submissions to approve or reject. holds the job titles used in profiles.
Hiring Pipeline and Interviews
Every job has a hiring board. Employers open it from the job's applicants and drag each application through the stages Applied → Viewed → Shortlisted → Interview → Offered → Hired or Not selected. The candidate sees each change on a timeline under the application.
- Interview invitations: online (with a meeting link), in person (with an address) or by phone. The candidate accepts, declines or asks for another time, and can add the interview to a calendar.
- Reminders: both sides get a notification 24 hours before the interview. This runs from the scheduler (
hiring:remind, hourly), so the cron line from Server Setup must be in place. - Private notes and rating: employers keep notes and a 1–5 rating per applicant; candidates never see them.
- Withdraw: a candidate can withdraw an application that is not finished yet.
The same board, invitations and timeline are in the mobile app.
Plans and Subscriptions
Employers buy a plan to post jobs. Create plans in ; they appear on the website pricing page and in the app.
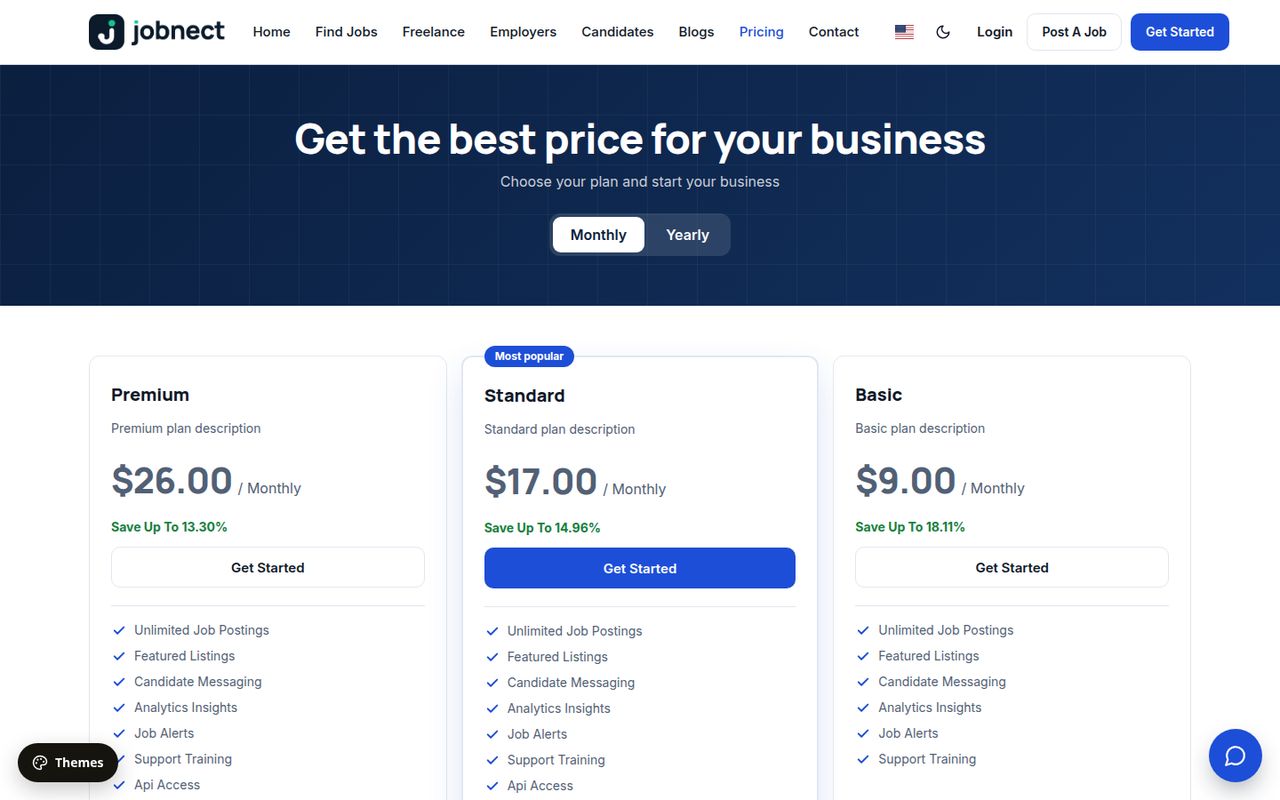
lists purchased plans. Plans paid online are activated automatically after the gateway confirms the payment. Bank-transfer purchases wait for you: check the transaction ID the employer entered and approve the subscription. lists the payments.
Payment Gateways
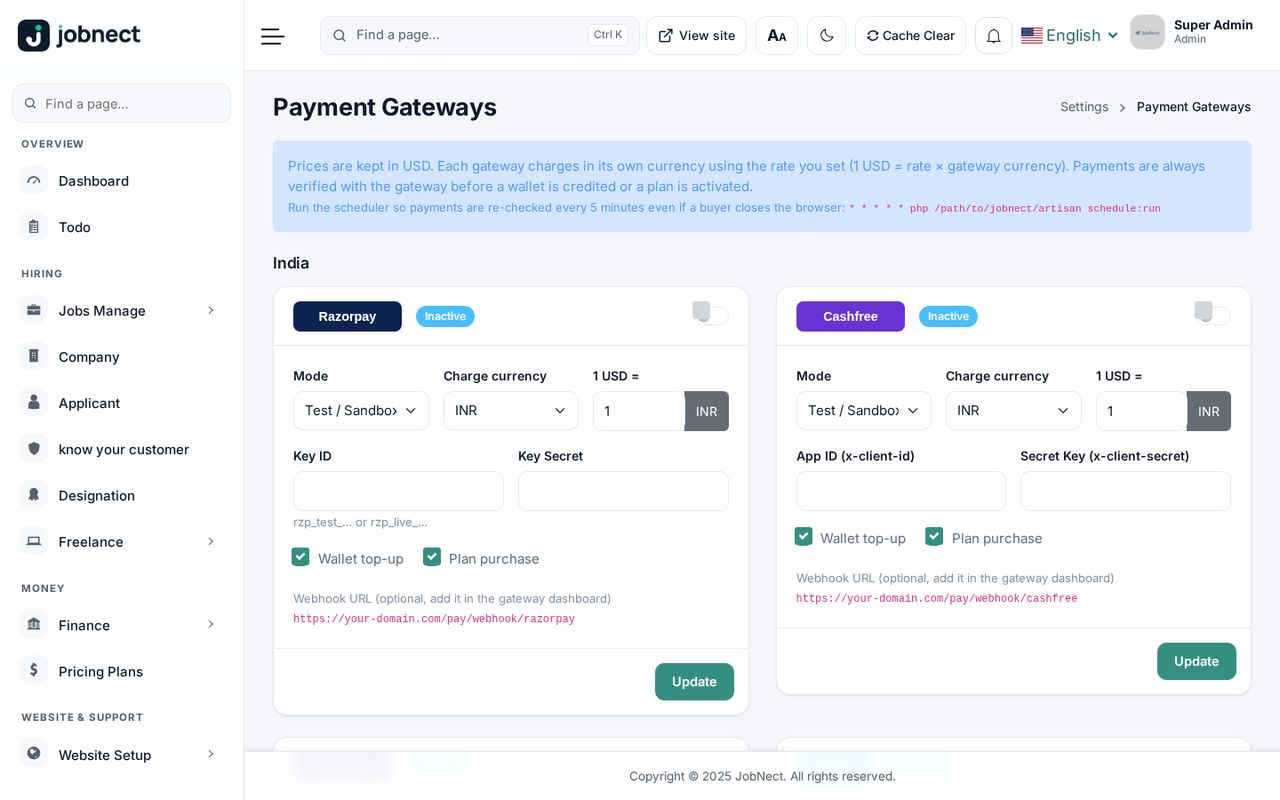
lists 10 online gateways, grouped by region. They are used for employer plan purchases and for wallet top-ups, on the website and in the app.
| Region | Gateways | Credentials asked for |
|---|---|---|
| India | Razorpay | Key ID, Key Secret |
| Cashfree | App ID (x-client-id), Secret Key (x-client-secret) | |
| PhonePe | Client ID, Client Secret, Client Version | |
| Paytm | Merchant ID (MID), Merchant Key, Website name, API host (optional) | |
| International | Stripe | Publishable key, Secret key |
| PayPal | Client ID, Client secret | |
| Flutterwave | Public key, Secret key | |
| Mollie | API key | |
| Paddle | API key, Client-side token | |
| 2Checkout | Merchant code, Buy-Link Secret Word |
Per gateway
- On/off switch. All gateways ship switched off with empty keys.
- Mode: Test / Sandbox or Live. Use test keys with test mode and live keys with live mode.
- Charge currency and rate: prices are kept in your site currency; each gateway charges in its own currency using 1 site currency = rate × gateway currency.
- Wallet top-up and Plan purchase: where the gateway is offered.
- Credentials are stored encrypted. A saved secret shows as dots; leave the field empty to keep it.
Webhook URLs
Every gateway card shows its webhook URL, in the form https://your-domain.com/pay/webhook/<gateway> (for example /pay/webhook/stripe). Adding it in the gateway’s dashboard is optional but recommended: the gateway then tells your site about a payment even if the buyer never comes back. Return and cancel URLs are sent automatically with each payment; you do not configure them.
How a payment is confirmed
The buyer pays on the gateway’s hosted checkout. JobNect then verifies the payment with the gateway on the server before it credits a wallet or activates a plan, and it does this only once per payment. The payments:reconcile scheduler task re-checks pending payments every five minutes, so set up the cron job. The mobile app uses the same hosted checkout and returns to the app through the jobnect:// link.
2Checkout confirms payments through the signed return URL: set the return method to Redirect in your 2Checkout account. Paytm: use WEBSTAGING as website name for staging and DEFAULT for live.
Test every gateway in test mode with a small amount before switching to live. Most gateways require your site to run on HTTPS.
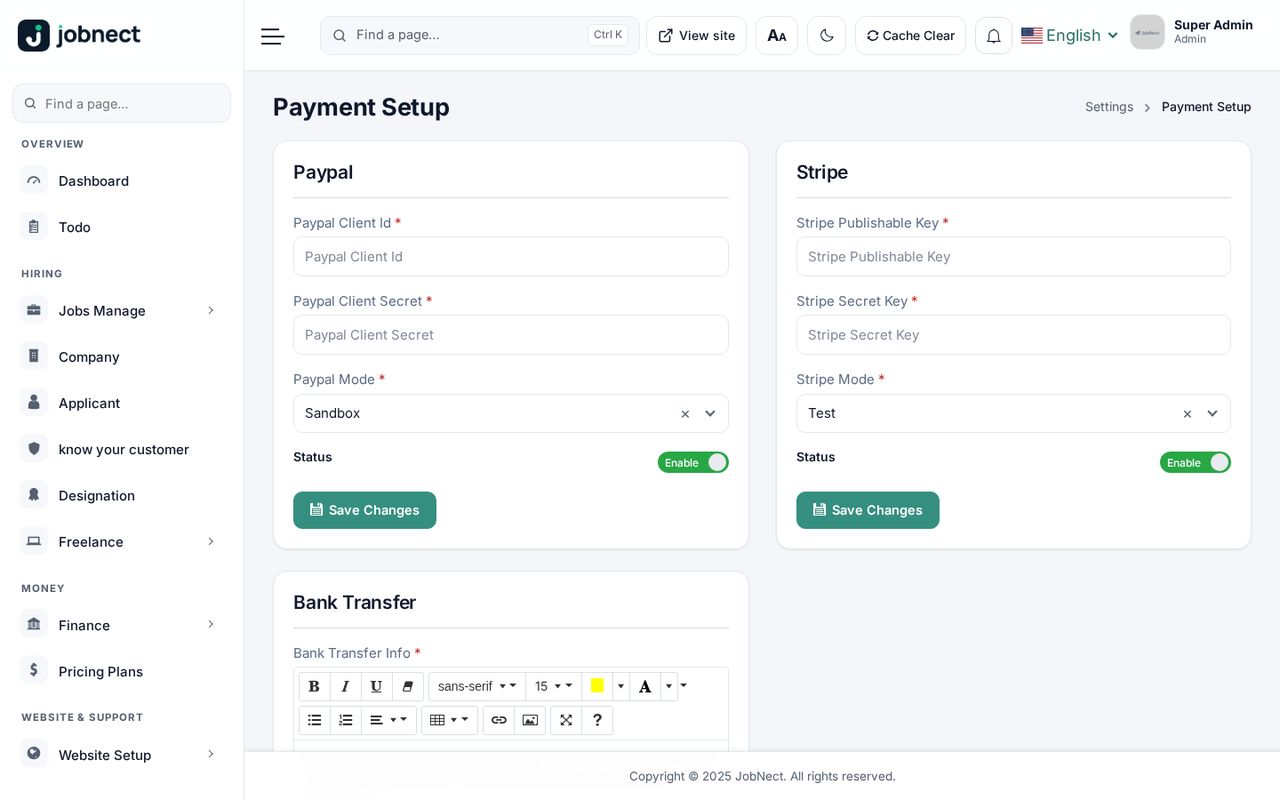
Bank transfer
has the Bank Transfer switch and the instructions shown at checkout (bank name, account, reference). The buyer pays outside the site and enters the transaction ID; you approve it. Configure Stripe and PayPal under Payment Gateways, not on this page.
Freelance Marketplace
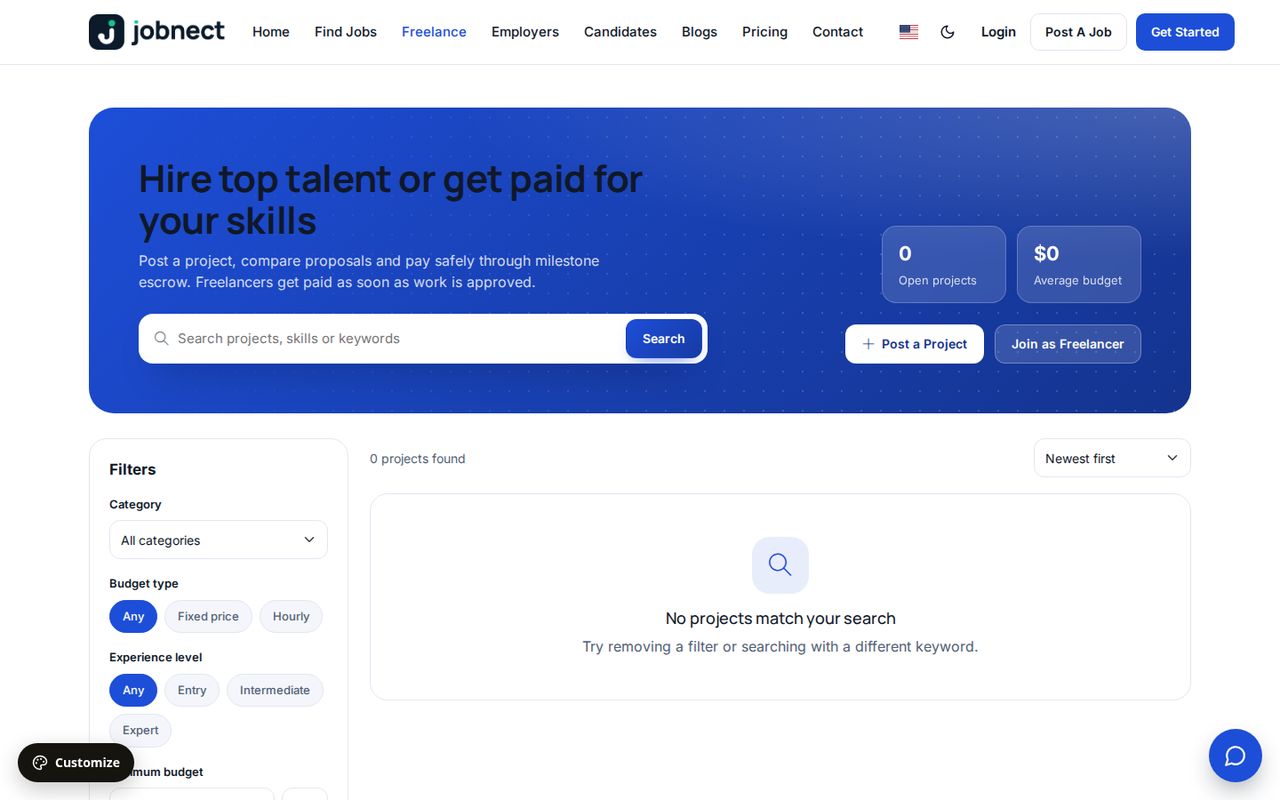
The freelance board (/freelance) lets companies and candidates post projects and hire each other, with payment held in escrow.
- A client posts a project: fixed or hourly budget, skills, experience level, deadline.
- Freelancers (candidates) send proposals. The client shortlists, declines or hires.
- Hiring creates a contract with milestones. The client funds a milestone from the wallet into escrow.
- The freelancer submits the work; the client asks for a revision or approves. Approval releases the money to the freelancer minus the platform commission.
- Either side can open a dispute. The admin resolves it by releasing or refunding the escrow.
- Both sides chat inside the contract and review each other at the end.
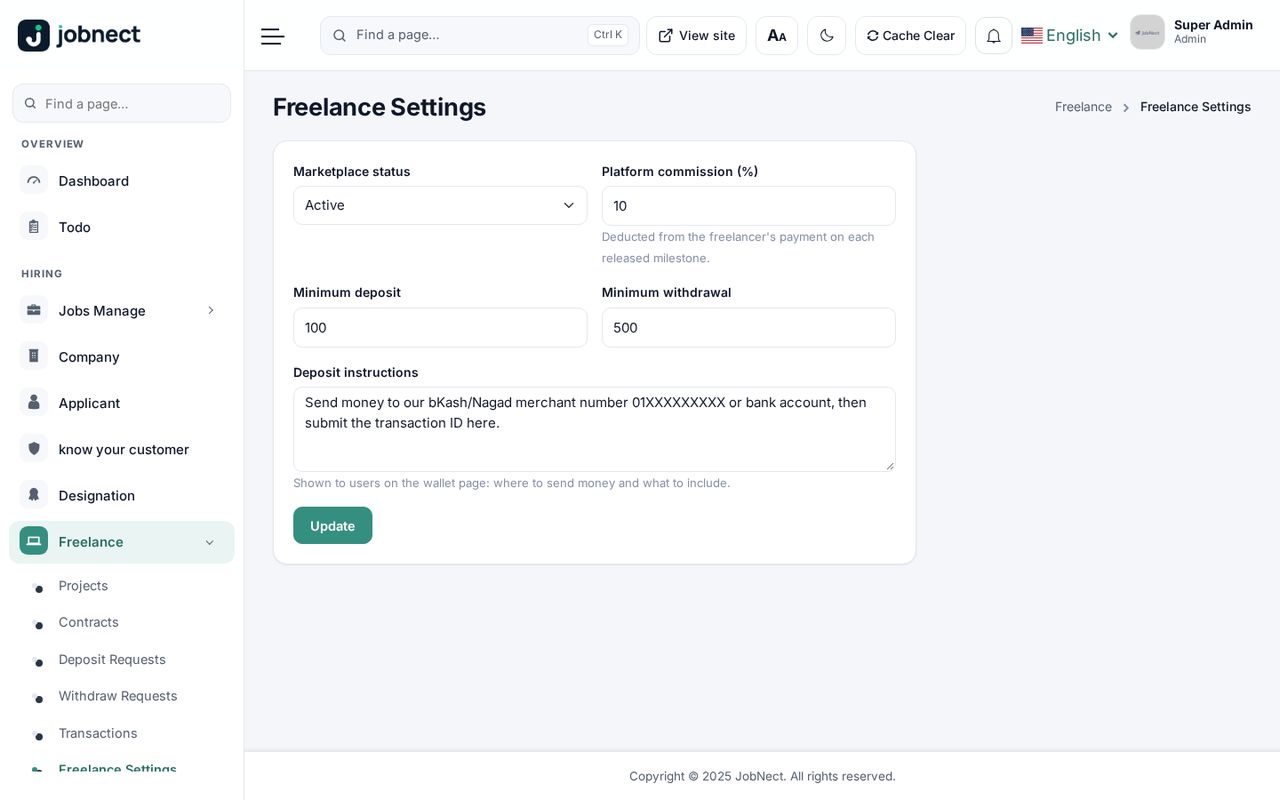
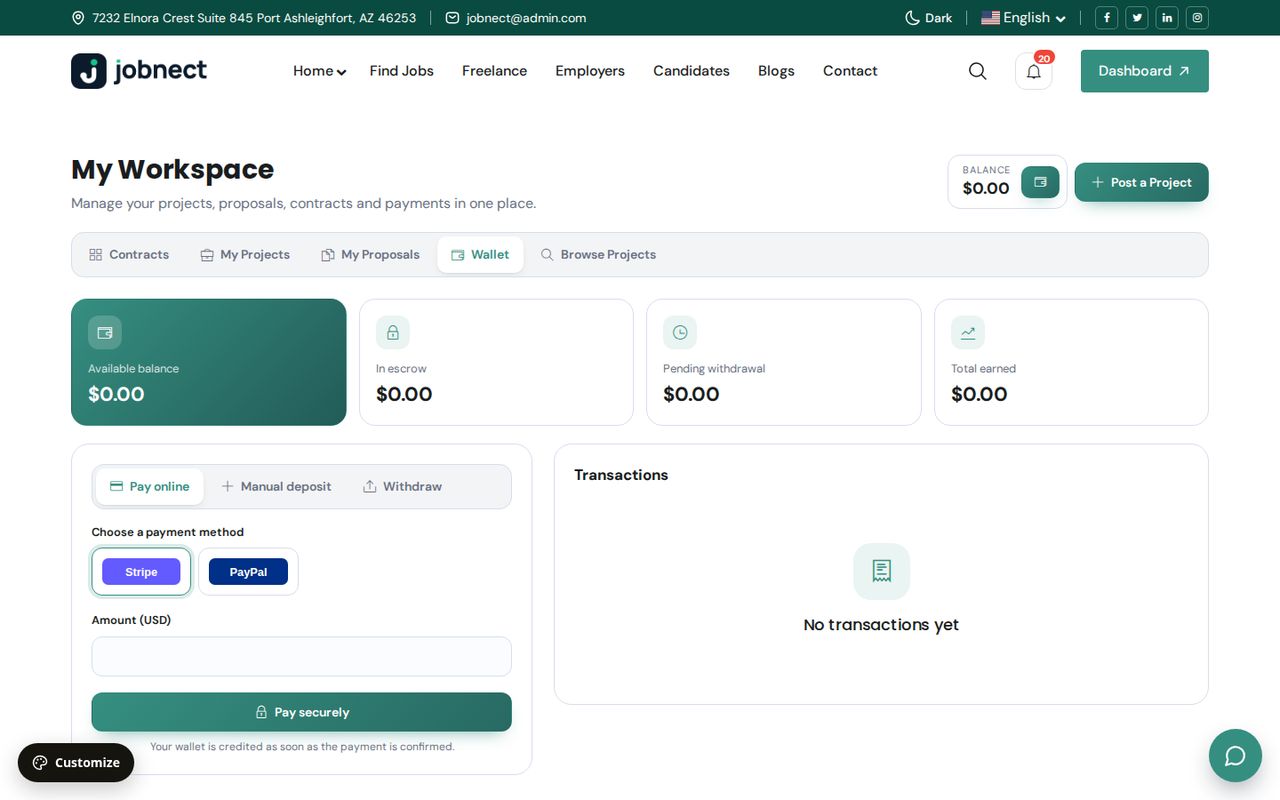
Users work from My Workspace: My projects, Proposals, Contracts and Wallet. Admins use the menu: Projects, Contracts (including disputes), Deposit Requests, Withdraw Requests, Transactions and Freelance Settings.
: marketplace on/off, platform commission (%), minimum deposit, minimum withdrawal, and the deposit instructions shown to users (for example your bKash, Nagad or Rocket merchant number or bank account).
Wallet
Every user has a wallet with four totals: available balance, in escrow, pending withdrawal and total earned, plus a full transaction ledger.
- Pay online: top up with any gateway that has Wallet top-up ticked. The balance is credited after the payment is verified.
- Manual deposit: the user sends money (bKash, Nagad, Rocket, bank) and enters the method and transaction ID. You approve it in .
- Withdraw: the user requests a payout; you pay it outside the site and approve it in .
Notifications
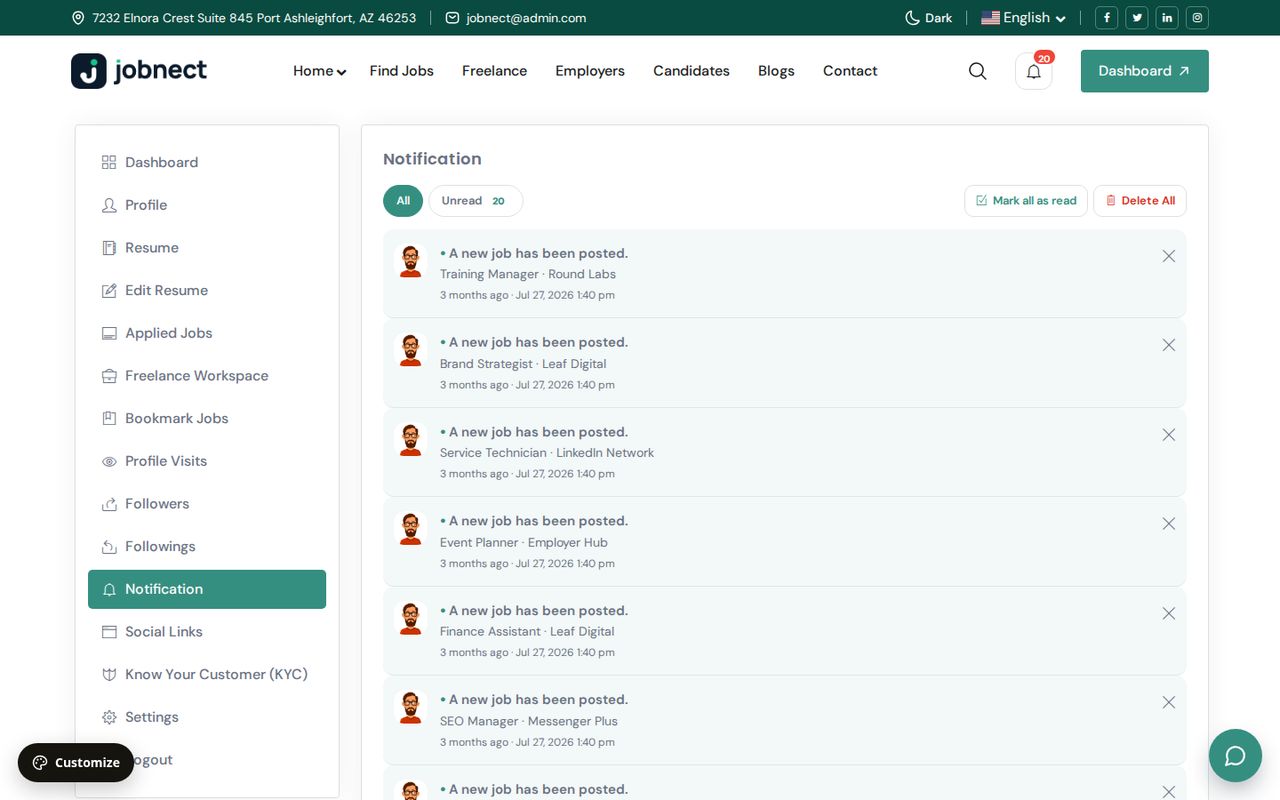
Admins, employers and job seekers have a bell with an unread badge that refreshes on its own, and a full notifications page with All / Unread filters, mark-all-as-read and delete. Events include new applications, follows, KYC results, payments, registrations, contact messages, freelance and wallet activity. The mobile app has its own notification screen with an unread badge; tapping a notification opens the related screen.
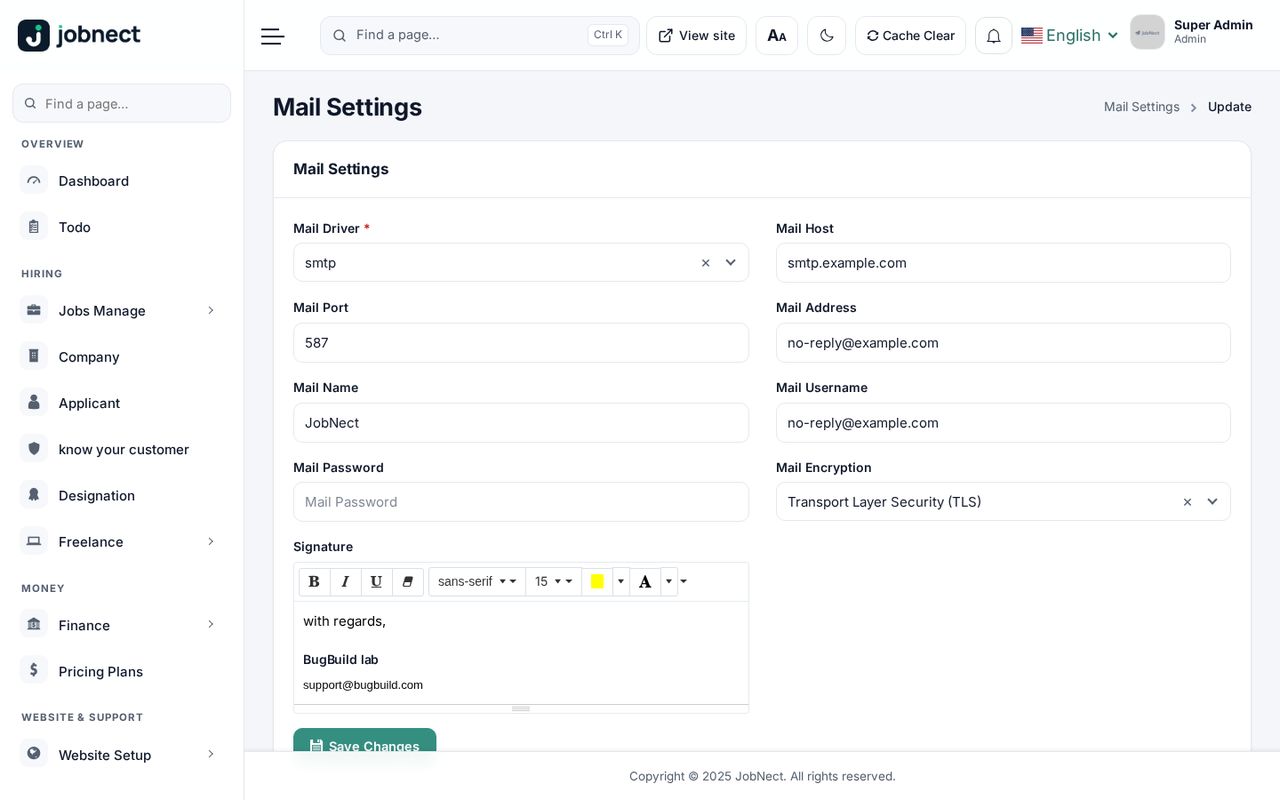
Mail (SMTP)
. Registration codes, password resets and notifications are sent by email, so set this up first.
| Field | Example |
|---|---|
| Mail driver | smtp |
| Mail host | smtp.your-provider.com |
| Mail port | 587 (TLS) or 465 (SSL) |
| Mail username / password | The SMTP login from your mail provider |
| Mail address / name | The sender address and name, for example [email protected], JobNect |
| Mail encryption | TLS for port 587, SSL for port 465 |
Save, then use the test box on the same page to send a test email.
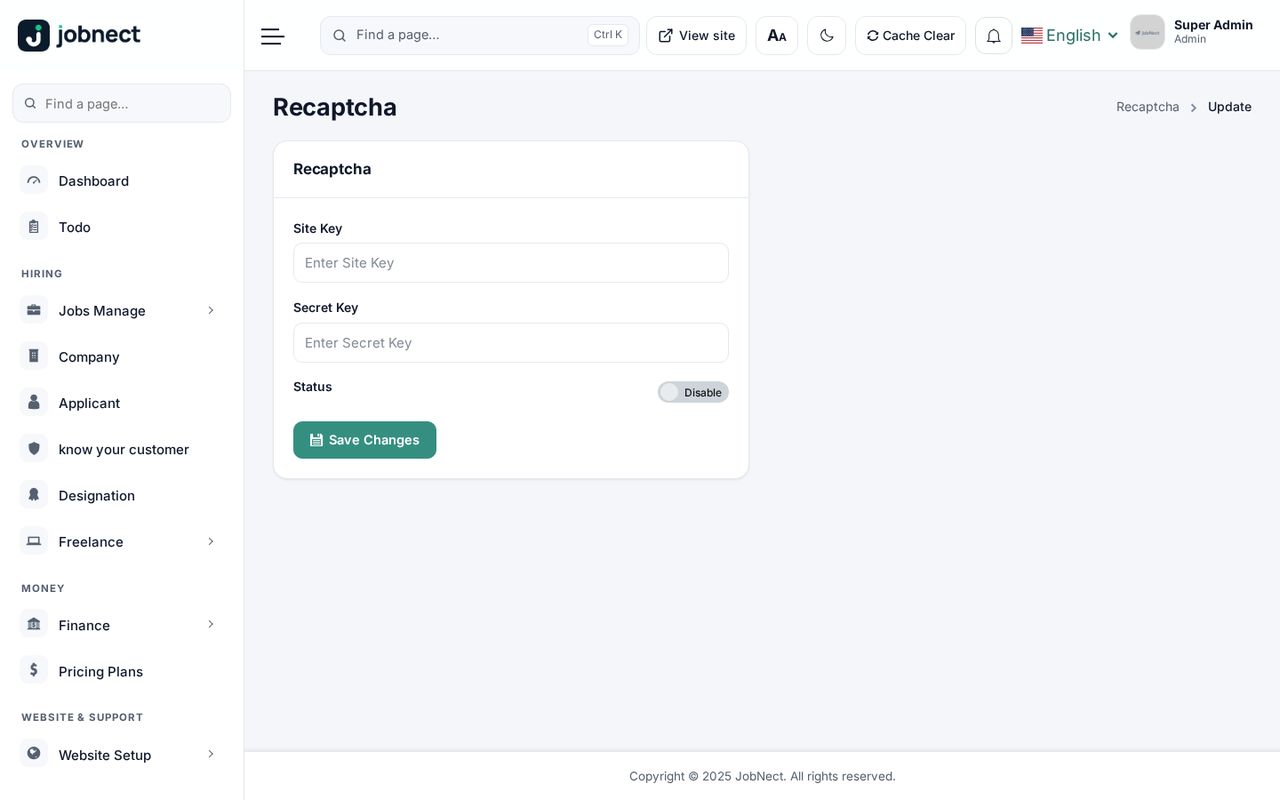
reCAPTCHA
Create a Google reCAPTCHA key pair for your domain, then enter the Site Key and Secret Key in and switch the status on. Switch it on only after both keys are saved.
Languages, RTL and Phrases
lists the site languages. After installation English, Bangla, Spanish and Hebrew are set up; Hebrew uses right-to-left layout on the website and in the app.
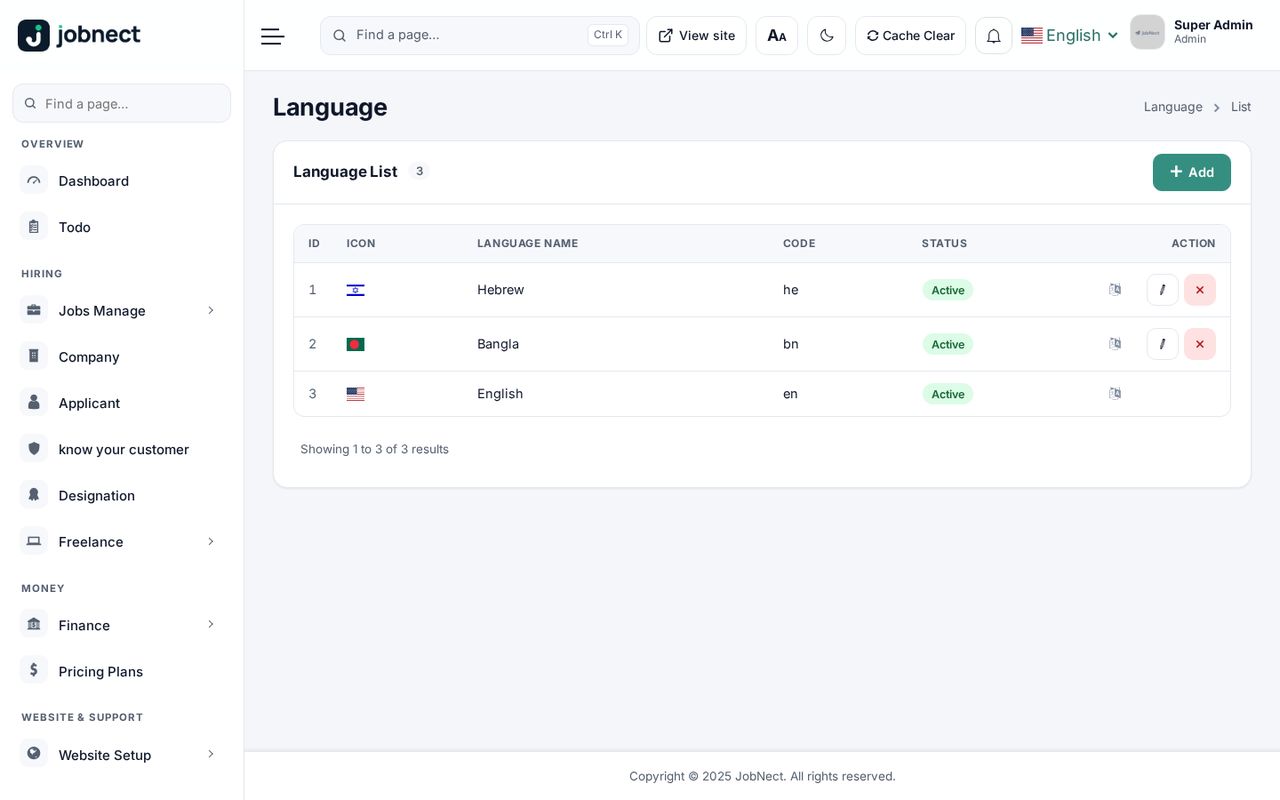
- Add a language: name, code (for example
es), flag icon and text direction (LTR or RTL). - Export / import: download a language as a ZIP pack or import one (see Language packs).
- Edit phrases: the translate icon opens the phrase editor. Choose a module (labels, menus, alerts, payment, freelance and so on) and translate each phrase.
A phrase that is not translated yet in the visitor's language is shown in English. English, Bangla and Spanish are complete; Hebrew is a right-to-left sample that covers part of the phrases, so finish it in the phrase editor before you offer it to visitors.
Using JobNect in Any Country
JobNect is not tied to one country. Set these once after installing:
- Market: decides where the job board works:
- International: jobs in any country. The home page lists Jobs by country; there is no Overseas link.
- Home country + overseas: a national job board that also lists jobs abroad. The home page lists Jobs by location (the home country's states or regions with the most jobs, or Bangladesh's 8 divisions) and an Overseas jobs link.
- Single country only: everything stays in the home country. Every country, state and city list (website, admin and app), every job post and every job listing is limited to it, and the country is preselected in forms.
- Currency, date and time: in the same General Settings page (currency, date format, time format). Payment gateways convert to their own charge currency with the rate you set per gateway.
- Default language: General Settings → Default language. Add your language as described below.
- Location data: countries, states and cities for the whole world are installed. Hide the places you don't serve, or replace them for your country (see below).
Language packs: export and import
In each language has a download icon. It saves a .zip language pack with every phrase file (labels, menus, alerts, payment, freelance, hiring and so on) and a manifest.json. Send it to a translator, edit the JSON files, then use Import on the same page to load it. Importing creates the language if it is new (name, code and text direction come from the manifest) or updates its phrases. Untick Replace phrases this site already has to add only phrases that are missing. Packs move between JobNect sites the same way.
Only packs exported from a JobNect site are accepted: flat .json phrase files plus manifest.json. Anything else in the ZIP is refused.
Location data: import and export
imports countries, states and cities from the bundled world files or from your own CSV files, for every country or just one. Export location data on the same page downloads countries, states or cities as CSV, for all countries or one, in exactly the columns the importer reads (id,name,iso2,phonecode, id,country_id,name and id,country_id,state_id,name). Edit the CSV in any spreadsheet and import it here or on another site.
Roles and Permissions
defines roles, each with a set of permissions (read, create, update, delete and more per module). creates staff accounts; each staff user gets a role and can have permissions adjusted individually.
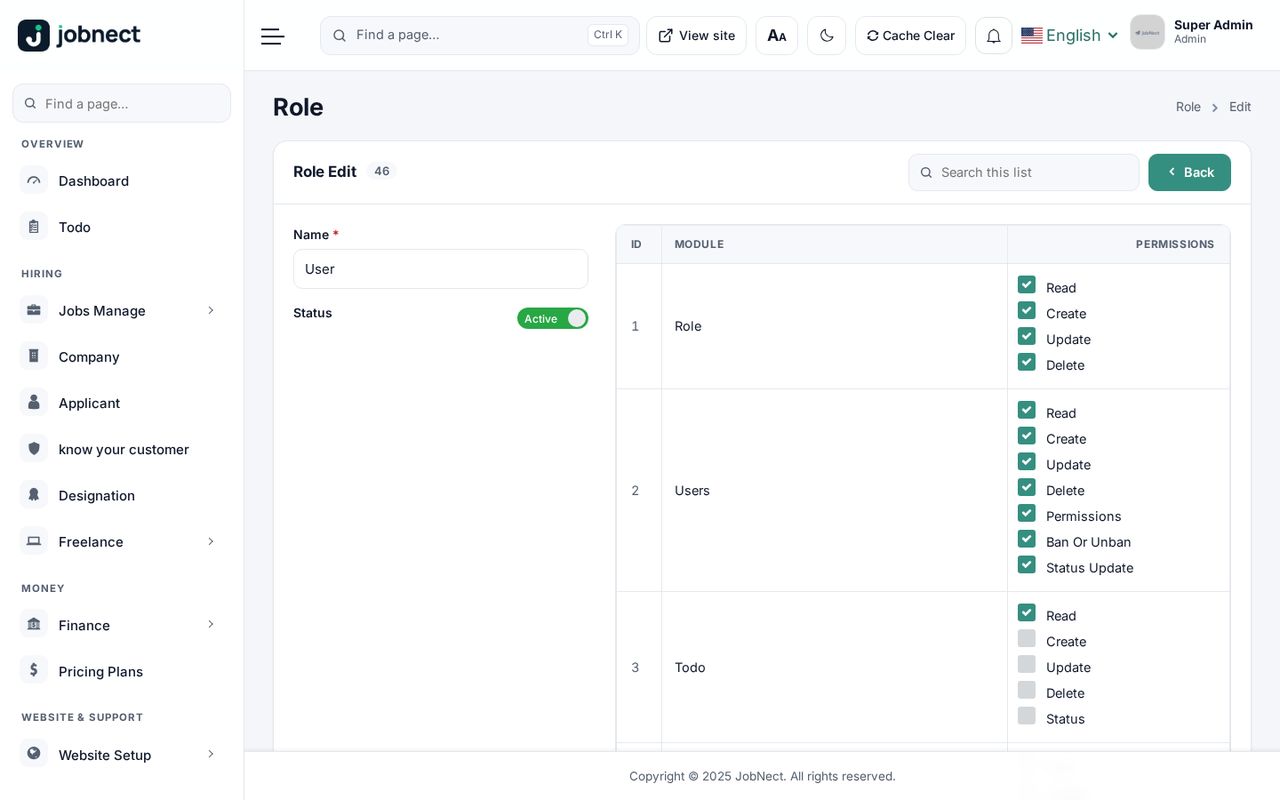
The sidebar and each page follow these permissions: staff only see what they are allowed to use. After an update that adds new admin features, the administrator role receives the new permissions automatically; tick them for your other roles yourself.
Admin Panel Tour
- Sidebar: grouped into Overview, Hiring, Money, Website & support and System, with a search box on top.
- Ctrl+K (Cmd+K on Mac) opens the command palette: type a page name and press Enter.
- Top bar: View site, text size (Aa), dark mode, Cache Clear, notifications, language and your profile.
- Dashboard: KPI cards with sparklines, quick actions (post a job, add company, review KYC, open live chat), "needs attention" items, charts.
- Lists: every table has a live count and a quick search.
- , , and (downloads a SQL dump of the database).
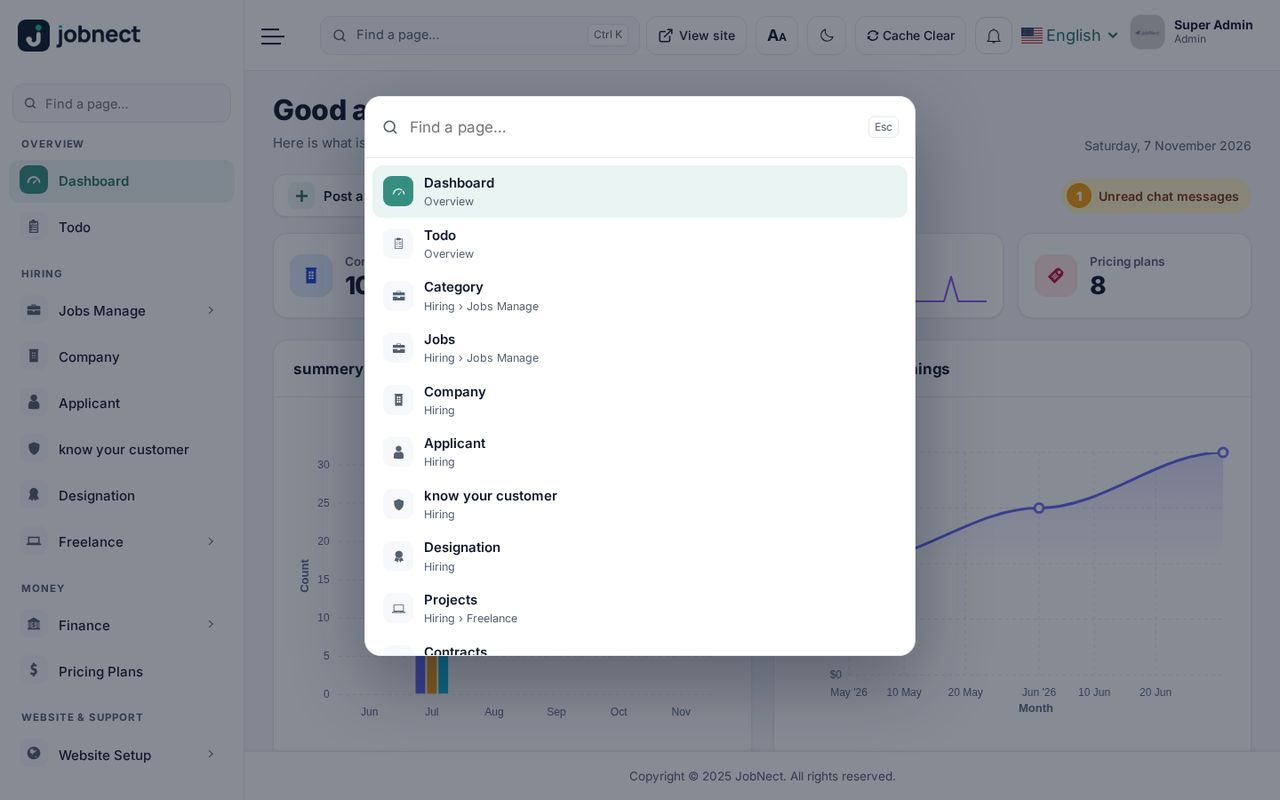
Updating: System Update
Every release ships as the same full WebSourceCode folder you installed from. installs it in one of two ways and shows the installed version, a server check and what the last update applied.
Automatic update (recommended)
- Back up the database and the site folder (see Backups).
- ZIP the new
WebSourceCodefolder (or its contents). The ZIP is about 50 MB, so PHP needsupload_max_filesizeandpost_max_sizeof at least 64 MB (128 MB recommended) and nginx needsclient_max_body_sizeto match; see Server Setup. If you cannot raise them, use the manual update below. - Open , check that the Server check has no red items, choose the ZIP and click Install update.
Before changing anything the screen checks PHP, extensions, upload size, time and memory limits, writable folders, free disk space and the packages the release needs. Then it puts the site in maintenance mode, backs up each folder it replaces to storage/app/updates/backups/, copies the release and finalizes it: migrations, new permissions for the Admin role and its users, new settings, languages, theme homepage sets, world location data if missing, the storage link and caches. The site comes back up and the report is shown on the page.
- Never replaced:
.env,storage,vendor,public/uploadsandpublic/storage. If a release’s notes say its PHP packages changed, also upload that release’svendorfolder over yours (File Manager or SFTP) before you finalize. - Translations are merged: new phrases are added, and phrases you edited in Language → Phrases are kept.
- Any newer release can be installed directly; versions do not need to be installed one by one.
Manual update (cPanel or VPS)
Use this if your host blocks large uploads or ZIP extraction.
- Back up the files and the database.
- Extract the ZIP on your computer and upload the contents of
WebSourceCode/(includingjobnect-update.json) into your project folder, choosing Replace. Do not replace.env,vendor,storage,public/uploadsorpublic/storage. With SSH:rsync -avz --exclude='/.env' --exclude='/storage' --exclude='/vendor' --exclude='/public/uploads' --exclude='/public/storage' WebSourceCode/ /path/to/project/ - Sign in as admin. Every admin page sends you to System Update until the update is finished; the new version is detected automatically. Click Finalize manual update, or run
php artisan jobnect:upgradeover SSH.
Manual update on a VPS (SSH)
# on your computer: copy the new release to the server
scp jobnect-update.zip user@your-server:/tmp/

# on the server
cd /tmp && unzip -q jobnect-update.zip -d jobnect-new
mysqldump -u jobnect -p jobnect > ~/jobnect-backup.sql          # back up first
sudo rsync -a --exclude='/.env' --exclude='/storage' --exclude='/vendor' \
  --exclude='/public/uploads' --exclude='/public/storage' \
  /tmp/jobnect-new/WebSourceCode/ /var/www/jobnect/
cd /var/www/jobnect
sudo -u www-data composer install --no-dev --optimize-autoloader   # picks up new packages, if any
sudo -u www-data php artisan jobnect:upgrade                     # migrations, permissions, settings, caches
sudo chown -R www-data:www-data /var/www/jobnect
sudo systemctl reload php8.3-fpm
sudo supervisorctl restart jobnect-reverb                       # only if you run live chat
Adjust the paths, database name and user to your server. If the ZIP holds the folder contents instead of a WebSourceCode/ folder, rsync from /tmp/jobnect-new/.
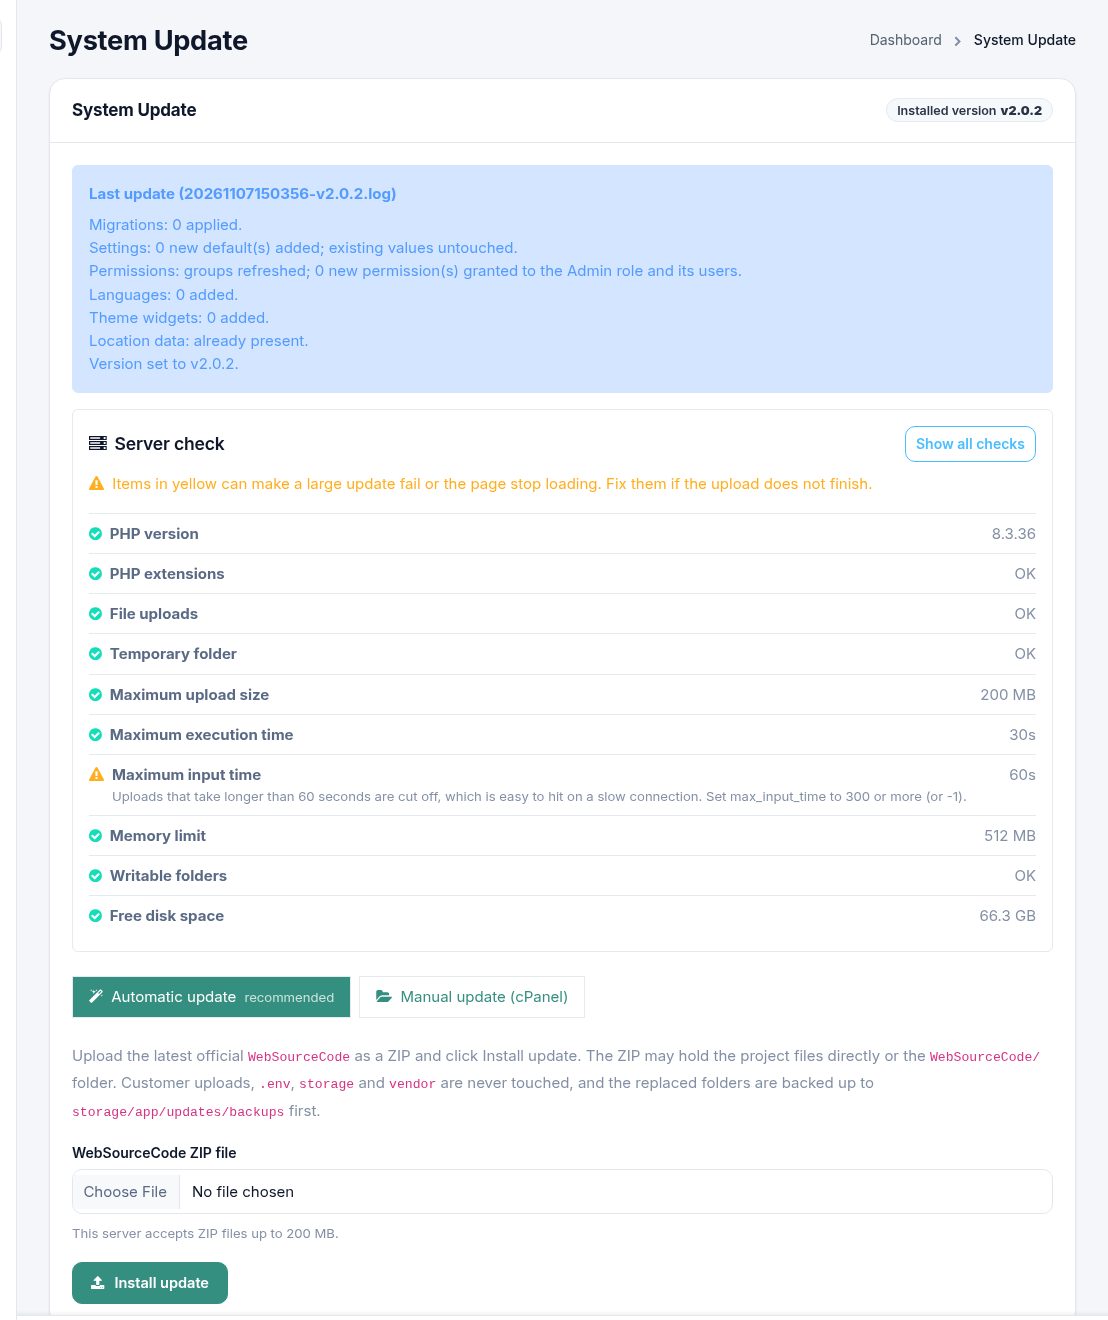
Run database sync (on the Manual tab) applies new migrations, permissions and default settings without changing the version. It is safe to run any time.
Updating from 1.x to 2.0
Version 1.x has no System Update screen and runs on Laravel 10, while 2.0 needs Laravel 13 and PHP 8.3. So this one jump is a manual update with new packages:
- Back up, and switch the site to PHP 8.3 or newer.
- Copy the files as in Manual update step 2, and copy
composer.jsonandcomposer.lock. - Replace your
vendor/folder with the one in the 2.0WebSourceCode(or runcomposer install --no-dev --optimize-autoloader). - Run
php artisan jobnect:upgrade(or click Finalize manual update). - Add to
.envwhat is new in 2.0 if it is missing: theREVERB_*block andBROADCAST_DRIVER=reverb(copy from.env.example), and check thatJWT_SECREThas a value. Add the cron job if you did not have one.
Your site stays on the Classic theme with the homepage sections it showed before until you pick another theme. From 2.0 on, updates use the System Update screen.
Do not run the web installer on an existing site: it is locked on installed sites, and it would replace the database. On the public demo (APP_DEMO=true) the System Update screen is switched off; update a demo server over SSH with php artisan jobnect:upgrade.
Update the mobile app at the same time: build the new app from AppSourceCode (see Mobile App).
Troubleshooting and FAQ
| Problem | Fix |
|---|---|
| 500 error right after upload | Make storage/ and bootstrap/cache/ writable by the web server, make sure .env exists and run php artisan key:generate. Details are in storage/logs/laravel.log. |
| Blank page or "vendor/autoload.php not found" | The PHP packages are missing. Run composer install --no-dev --optimize-autoloader in the site folder. |
| Every page redirects to /install | The database is unreachable or APP_INSTALLED is not yes. Check the DB_* values in .env, then run php artisan optimize:clear. |
| Installer says the database connection failed | Use 127.0.0.1 instead of localhost, and check that the user has all privileges on the database. |
| Installer page stops or times out | Raise max_execution_time (120 s or more) and memory_limit (256 MB) for the install, empty the database and submit again. |
| 404 on every page except the home page | URL rewriting is off: enable Apache mod_rewrite and AllowOverride All, or use the nginx try_files rule from Server Setup. |
| Images or uploads do not show | Make public/uploads/ writable, run php artisan storage:link, and set APP_URL to your real address (with https). |
| Chat messages are not instant | Reverb is not running or not reachable. Check supervisorctl status, the nginx /app proxy and the REVERB_HOST/PORT/SCHEME values. Without Reverb the chat still refreshes every 10 seconds. |
| Emails are not sent (no verification code) | Check Settings → Mail Settings and send a test mail. Wrong port and encryption pairs are the usual cause: 587 with TLS, 465 with SSL. Some hosts block outgoing SMTP ports. |
| Online payment paid but plan not active | Make sure the cron job runs; the reconcile task completes paid payments within five minutes. Check that test or live mode matches your keys and that the webhook URL is correct. |
| Google login error "redirect_uri_mismatch" | Add exactly https://your-domain.com/login/google/callback to the OAuth client. |
| Changes to .env have no effect | Run php artisan optimize:clear. |
| Mobile app cannot log in | Check AppConfig.apiHost in the app, that the site runs on HTTPS, and that JWT_SECRET is set in .env. |
Changelog
Version 2.0.0 — 7 November 2026
New
- Two new full-site themes, Momentum and Meridian, alongside Classic, Vista and Spotlight, with a theme manager in the admin panel.
- Customize panel: theme, accent colour, font pair, corner radius, text size and light/dark mode, with "make live" for admins.
- New logo and favicon; Branding section with live previews.
- Job Hub: stats bar, quick links, jobs by location, job sector, age limit and experience range, new filters on the website and in the API.
- Hiring pipeline: Kanban board per job, application stages with a candidate timeline, interview invitations with reminders, private notes and ratings, withdraw.
- International: home country setting (or none for an international board), jobs by country or region, language pack export/import, location data CSV export, English fallback for untranslated phrases, Spanish ready after install.
- Redesigned job cards with location, experience, openings, salary and days left.
- System Update: install a new release by ZIP upload or finalize a cPanel copy, with a server check, backups, translation merging and an update report;
php artisan jobnect:upgradefor SSH. - Mobile app links: Google Play and App Store buttons in every footer and newsletter style, set in Settings → Mobile app links.
- Freelance marketplace: projects, proposals, contracts with milestones and escrow, disputes, contract chat, reviews.
- Wallet: balance, escrow, ledger, manual deposits, online top-up and withdrawals.
- Payment gateway layer with 10 gateways (Razorpay, Cashfree, PhonePe, Paytm, Stripe, PayPal, Flutterwave, Mollie, Paddle, 2Checkout), plus bank transfer; server-side verification and a scheduled reconcile task.
- Notification centre for admins, employers and job seekers, on the website and in the app.
- Live support chat with Laravel Reverb, polling fallback, WhatsApp and Messenger buttons.
- Redesigned admin panel: grouped sidebar with search, Ctrl+K command palette, text-size control, KPI cards with sparklines, list tables with live count and quick search.
- Redesigned login, register and password screens and candidate lists.
- One mobile app for job seekers and employers, with the new features, notifications and payment return by deep link.
- Upgraded to Laravel 13 and PHP 8.3; app on Flutter 3.44.
Security
- The installer can no longer be run again on an installed site, and the admin password is no longer passed in the URL.
- The one-click demo login works only on a demo site and only for the demo accounts.
- The language-file endpoint no longer accepts paths outside the language folder.
- An application's detail page is only visible to its employer, the candidate and admins.
- Uploaded files are no longer altered by the input filter, so uploads on filtered forms validate correctly.
- Removed a public URL that reset the whole database for any visitor; clearing caches now needs an admin login.
- System Update refuses uploads on a demo site, and refuses packages with unsafe paths, older versions or missing packages before changing anything.
Version 1.2.3 — 31 March 2026
- Applicant app and employer / company app combined into one listing description
- Employer / company app APK demo link added
- Separate demo logins and feature lists for applicants and employers
- Employer / company documentation title and status note updated
Version 1.2.2 — 14 July 2025
- KYC verification: users submit their KYC documents through a dedicated form with image / PDF upload
- Date format: all dates follow the format set on the backend
- Job description now displays properly, without overflow or layout issues
- Currency: salaries and other amounts use the site’s currency symbol and formatting
Version 1.2.1 — 14 October 2024
- App: fixed the “LatestJobsController not found” error
Version 1.2.0 — 6 October 2024
- App: bookmarked and applied job lists now update correctly
- App: session issue fixed
- App: prevented a user from being signed in to another user’s account
- Web: applicant and company create / update fixed
- Web: app dark logo setting added
Version 1.0.0 — 27 September 2024
- Initial release
Support
Email [email protected] with your purchase code, your site address, what you did and what you saw (a screenshot and the last lines of storage/logs/laravel.log help a lot). Support covers installation questions and bugs in the item, as described in the Envato item support policy. Customisation and server administration are not included.
Google Login
https://your-domain.com/login/google/callback.A Sign in with Google button then appears on the login and register pages.